Sunday, June 27, 2010

15mm Blue Moon Is HO Scale

Earlier this year, Old Glory under their Blue Moon Manufacturing heading started making 15mm pirate, wild west, and World War I figures, with plans for science fiction in the near future. I knew these figures were larger than other 15mm figures, coming out closer to 18mm but gladly bought all the pirate codes they had. I passed on the wild west because I have been rooted in 25mm western, but it was very tempting to start another scale/size!

Yesterday, I decided to size up the figures next to my 35-year old scale ruler. Lo and behold, the figures are nearly dead on for HO scale as you can see in the photo. The Blue Moon pirates scale to about 5.5' tall--just about right for average humans of that time and close enough for me in general.

From left to right, the figures are Rebel Minis, Peter Pig, Splintered Light, and the Blue Moon. You can see how much larger the Blue Moon figure is to the other three. The upcoming Blue Moon aliens might work because aliens can be larger than humans. However, I would not want to mix Peter Pig pirates and westerns with their Blue Moon counterparts.

Ran Out of Time: More To Come Later!
I was going to do a large section on using the Blue Moon Western figures with HO scale models but have run out of time this evening. I'll work on it for tomorrow or asap. Being a model railroader, I am now really tempted to jump into 15mm Westerns! My favorite hobby is building model railroad structures.

Thursday, June 24, 2010

Splintered Light Orcs & Goblins

Below are some photos from the demo game of Pride of Lions that John McBride put on at Cold Wars 2010. All the miniatures are from his son's 15mm miniature company, Splintered Light. The figures below were from my force of bad guy orcs and goblins. I love these figures! I'll get some photos of the game posted a bit later. Right now it's after midnight and I'm tired!

My father went in for a liver transplant today, so I am exhausted with shot nerves. He wasn't expected to make it to his 70th birthday at the end of the summer. This made me think of the McBrides and all the great spiritual support they game Jeremy and me at the convention. My folks live 30 minutes from Lancaster, and I grew up in the area. Cold Wars was perfect timing for us. I've written about this being a blessing during our difficult time in earlier posts. I'll end now before I really begin to get emotional and ramble more than usual!

Enjoy the photos. There are large, about 400k to save the detail. If I remember right, the bases are 40mm x 40mm? I'll have to double check that.


Monday, May 31, 2010

GMT's Monmouth: Our First Experience

During Memorial Day weekend, I always like getting in at least one wargame featuring an American force. Sometimes they are miniature games, sometimes computer games.

Yesterday afternoon, we tried playing our first game of GMT's Monmouth board game. Part of GMT's American Revolution Series, Monmouth recreates that famous battle of the AWI where both sides fought to a draw. This is a game Jeremy badly wanted for Christmas last year and that Santa delivered for him.

I won't bother writing a review of the game since you can read those at the game's entry on Boardgame Geek by clicking here. There is a good reason the game gets a 7.39 out of 10. It really is a nice set of rules.

First Scenario
I set up the first scenario in the rules, "Lee's Advance," where Lee and Lafayette head off Clinton while Cornwallis and reinforcements are only an hour (1 turn) behind. I snapped a photo of the set up above. I left the image large so you can enjoy the beautiful map and see the counters in action. You can also see it here at GMT's website. I played the British and Jeremy (theoretically) played the Americans. I say theoretically because he was supposed to play them but really spent his time working on the computer and his Zune across the room. (Remember how this is supposed to be his wargame? The first wargame he ever wanted to own? That's ok. I love the kid regardless!)

I discovered that the scenario took forever for me to setup, even though I had the counters pre-sorted into a counter tray. Each counter is a unique unit. (Note that the game comes with small baggies for the counters, which is a really nice touch, but I like trays. Old habits, I guess.) I also learned that a couple counters I needed were two-in-ones--the front and back were different units. Took me a while of searching for a needed counter before I figured this out, finding it on the backside of a counter. Live and learn.

Where To Deploy?
I had a tough choice for the British. They really were caught in a nice ambush situation. The Americans, due to Lee's bungling, really gave up a good opportunity to hurt the British historically. Back to the game... Should I plow down the road toward Lafayette in Monmouth to make way for Cornwallis' large force entering the next turn? That might leave me open to a flanking by Lee. Or do I deploy in the fields where I began, hoping that I don't get whooped and create a traffic jam preventing my main forces from deploying properly? Most of my units were light infantry and cavalry, typical for an advanced force but not meant for engaging a strong enemy head on. Only one unit was regular infantry, the Queen's Rangers. My choice? I deployed in the fields.

Sure enough, the Americans moved up and came toe-to-toe with Clinton. Lafayette also advanced to the north side of Monmouth. I felt the pincer beginning to pinch. Luckily my light artillery pushed back a small unit of Americans and my largest unit, the Queen's Rangers, clobbered one of the stronger units in Lee's advanced force during a massive first volley, sending it retreating across the field and flipped to its weaker side. Other fire caused some disorder among the rebels. However, the American fire did little to budge the stout Brits. The close combat was pretty much the same results due to the weakened American units. Lord Cornwallis would be happy to see his entry point cleared and Clinton holding the ground. And that was Turn 1.

Except for defensive artillery fire, all ranged and close combat in Monmouth is simultaneous. Since one needs to be contacting the enemy to fire and then to melee, it gets pretty bloody pretty fast when one unit out powers another, as had happened on Turn 1 for me. I like the combat system. Very simple yet effective, reflecting horse and musket. Add the command and control to the game, and we have a winner.

Curse These Hands!
Ok, and that is where the game ended for us. At the end of Turn 1. My hands were hurting too much to keep picking up the counters, which I could barely pick up anyway due to the psoriasis on my fingers flaring up. Rooting through the counters during set up had taken its toll on me. Made me mad, sad, and frustrated. It hurts to type right now as well, but I can work around it a bit to ease the pain. Constantly knocking over counter stacks is another matter. Sigh. This is why I like Company of Heroes--big thick counters I can easily pick up. But I will not let this latest malady stop me from enjoying my hobbies! I will not!

For More Info See...
If you'd like more info about the game, check the game's page at GMT's website. You can download the rules, map, and some sample counters. You can also check the game's page at Boardgame Geek. You can also order the game online from Cool Stuff for only $17. Folks, this game has a $50 retail! The game is on sale at GMT and Cool Stuff discounts the sale price even further. We are lucky that the nation's best online wargame discounter is 20 minutes down the street. We will play the rest of the scenario as soon as we can.

Sunday, May 30, 2010

Aeronef Inspiration & Painting Problems

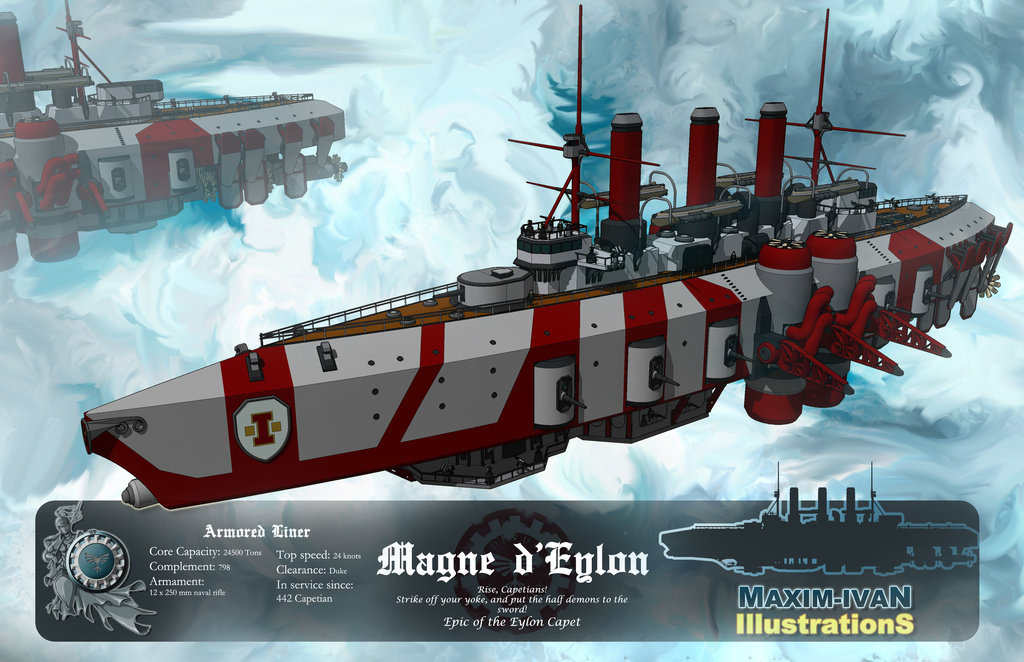
A few months ago I puttered along a bit on my Aeronef project, re-priming the figures, drilling and placing the rigging into the decks, and gluing on the other bits. My goal is to paint them using some of the anime-like images below as inspiration.

Masking Paint Problems
I masked off several of them using blue painters tape, began working on some of the patterns, but discovered that painters tape does not like craft paint, pulling off bits of it. Ouch! I haven't tried masking hobby paints like Vallejo or Reaper and am wondering if I will get the same results. Is this an acrylic paint problem? I let the paint dry before removing the tape.

Many years ago when I custom painted model railroad equipment, I would spray them using model railroad hobby paints and use plain masking tape to mask them. I never had a problem. One thought I literally just had was to paint the base coat, dulcote it, mask it, paint the new color, dulcote, mask, and so on until done. Perhaps that would prevent the blue tape from peeling up the paint? Down side is that it would take a lot more time to work on each ship.

I would like to mask straight lines instead of free-handing them. Does anyone have any suggestions and experience with this?


Add Image

Saturday, May 29, 2010

Sheriff Office: Part 5 - Finished Model

Here are some photos of my finished model of Old Glory's 25mm Sheriff Office from their older Western building range.

Painting the Walls
The cell walls are "wet drybrushed" with Ceramcoat's Antique White, with some areas dirtied up using a grayish ink wash--you really can't see that in the photos due to the lighting. I painted the office walls with Folk Art Bayberry. This is a classic light green that I have seen in many old railroad buildings from the turn of the century, so I decided to use it here as well. The wooden trim and doors are painted Ceramcoat's Walnut. The gun rack is Americana Light Cinnamon. The posters are from my earlier post.

The Jail Cell
When I went to put the jail bars in place, I discovered that the longest section did not fit between the back wall and the interior wall. The gap was too large for my tastes. The solution is what you see here. Instead of having a large cell on the right and a smaller cell on the left, I made the one cell. Works for me. I can always use the other cell piece for something else.

I dulcoted the building before gluing in all the pieces in place, making it easier to varnish everything evenly. I think it also helps the glue adhere. As a kid I was told that glue does not like paint. Anyway, I glued the jail using Zap-a-Gap on the bottom and ends of the pieces. This left a little puddle of dried glue on the floor, but I dabbed on some Ceramcoat matte varnish and took care of it.

Oops!
After finishing the building, I realized I had made a few mistakes. Looking at Old Glory's photo, I glued the windows upside down. I tried putting them in the other way but would have had to carve out some of the stone bricks to get the window sill to fit properly. Not my idea of fun. I think the windows look fine and doubt anyone will critique them. I am disappointed that the window openings are about 1mm to 2mm too wide, causing a slight gap between the window and the wall. You can see this when looking at the building from an angle.

My biggest oops was gluing the front door on backwards. I seem to have a problem with this! The door knob really should be on the right instead of the left. Oh well. If someone asks, I'll just say a left-handed carpenter built it and that it makes it easier for the right-handed sheriff to open the door when he's rushing out of the office to a gunfight in the street. (See, we can rationalize anything!)

Not Done Yet!
Having bought some thin plywood the other day, I still want to make a permanent base for the building. When I do that, I will add posts to the front porch. The porch being in sections like it is, I just felt the posts would get snapped off as I transported the building. I still want to add some interior details like a desk, cot, and so on. I got some great suggestions from TMP to use.

So there you have it. Now the dusty streets of Gun Town can finally have a real sheriff and retire their vigilance committee. At least that's what the sheriff thinks!


Thursday, May 27, 2010

Hartley House: Part 1 Building a Better House

The 25mm Harwood House from Old Glory's Western buildings line, pictured here from their website, has always had a problem that Old Glory knows about but cannot fix. The bottom off the roof is poorly designed, so that when you place the roof on the building it will literally fall down around the walls. In their website's photo, the only thing holding up the roof are the two dowels and probably some Photo Shop magic. Getting the porch posts to fit the bottom edge of the roof would be difficult due to poor casting, with little space along the roof edge as the photos will show.


Fixing The Roof
A while back, I came up with an easy solution you can see in the photo. I used a piece of thin plastic left over from an item we bought at the store. I have no idea what it was any more, but it came from one of those items that has a clear window letting you look in the box. I cut the plastic to fit the bottom of the roof and then glued it in place. In other words, I created a new bottom for the roof. No more falling off the building for this roof. Of course, I forgot to do this before I primed the building last week. Figures! We had a clear, dry day here in Central Florida, and I was so eager to take advantage of it that I sprayed the building, forgetting that I had to work on it first. Oh well. No harm done.

Adding Porch Posts
Guess what? I have finally added porch posts to one of my Western buildings! It suddenly looks like a real building with a real porch. Old Glory supplies dowels with all their Western buildings, but I really don't like them. Most posts in the real West would have been square instead of round, which cost more. Still, this being a residence I decided to use some balsa wood dollhouse posts I had gotten a couple years ago on sale. (Dollhouse stuff is great.) I cut the posts to fit the roof, drove a size #20 pin into the base of the post, drilled a hole into the porch floor using a #72 pinvise drill, and then glued the entire assembly into place using Zap-a-Gap superglue. Worked perfectly. Of course, I should have done this prior to priming last week! Oh well again. The posts are straight but look a bit off due to the angle of my camera.


Final Thoughts
While I like the building, it had a great deal of thick resin flash between the window openings. It was very difficult to remove since I don't have a Dremel tool (that will be changing soon!).

Later this week, look for photos of the finished Sheriff's Office and some newly painted Western figures. The project is really moving along. I'm even looking into building my own structures. After 35 years of wanting one, I am about to buy The Chopper wood cutting tool! Until next time...