Showing posts with label WWII Gaming. Show all posts

Friday, June 27, 2014

Rapiercon 2014: Flames of War Tournament

Goodbye 20mm WWII -- We Hardly Knew Ye
Some of you probably noticed that several weeks ago I was posting about leaving 15mm WWII skirmish gaming for 20mm WWII skirmish gaming. I had purchased a platoon of 20mm AB Americans and had begun painting them. Overall, they were nice figures. Surprisingly, I hated painting them! I realized that I would rather be painting 28mm figures, where I can really have fun painting detail on a small number of figures, or painting 15mm or smaller figures, where I don't have to worry about details and can paint with more speed while still feeling good about my work. 20mm just was the worst of all worlds for me.

When we got back to Rapiercon late in the afternoon, we stumbled upon the Flames of War tournament in a corner of the con hotel. I don't play FoW, but was excited to see all the 15mm game tables. They were a great inspiration for my skirmish gaming. Of course, earlier in the day I had taken all my miniatures and games back to our hotel down the road. Now I could have used my Peter Pigs to see how they compared to the various buildings other than my Landmark buildings, which are smaller true 1:100 scale. Oh well. Such is life!

The fellows we spoke with in the FoW room were friendly, happily chatting about the various buildings on the tables and FoW gaming. Jeremy lamented that we didn't play FoW because we probably would have had fun playing (and most likely losing to) most of the fellows there. I knew he was right. It felt like a whole different con in that room.


Wednesday, June 4, 2014

Down in Flames: WWII - Guns Blazing

I love card games, which is an understatement. I also love WWII  fighters and bombers, which is why I have a large collection of Wings of War/Glory WWII planes and built many of the models back in the day. When I stumbled on Down in Flames: WWII - Guns Blazing, it immediately grabbed my attention. I was lucky enough to buy a new copy off a fellow for the price of Priority Mail, saving me a ton of money. After all, the game retails for $60, with Cool Stuff selling it for $40. I'm looking forward to trying this out. I'll probably bring it with me to Rapiercon in Jacksonville in a couple weeks.

From DVG's website: "Down In Flames places each player in the cockpit of a fighter as they enter combat against other aircraft. By playing cards, you gain advantageous positions on your targets, fire your guns, and send them down in flames! The game is based on a unique action-reaction card mechanic. Each card can be countered by specific other cards. At the bottom of every card is the list of cards it is allowed to cancel. This makes for exciting card play back and forth between players."

I like that the game has planes and scenarios from the start of the war over France to North Africa and Malta to the Eastern Front to the end of the war. Plenty of variety with top-notch production. The map boards are thick cardboard; I originally thought they were paper.

See Boardgame Geek's Down in Flames page for reviews and more info, check out DVG's website for more info on the game and the Down in Flames series.

Monday, January 6, 2014

The Price of Victory - Turn 1

While I know that many guys are happy playing many of the popular World War II miniature rules that are available, it's no secret that I've been having a difficult time finding a set to handle a platoon per side that I really like. I want something that makes me face all the hard minute-by-minute decisions real commanders had to make. I want it nail-biting to the end, with victory never guaranteed. I want to feel for my soldiers. You know. The basics. :-)

I Create A Game That Works? No Way!
A couple months ago in a fit of frustration temped with rage, I threw up my hands, sat at my computer, and began banging out a set of rules that featured what I would like to see. I even came up with a name for them: "The Price of Victory." (I tried to avoid using words like "band of" or "brothers" or "heroes" in the title--the world cannot bear the weight of another WWII game with those words in its title! However, "Hero Brothers Band" did strike a chord with me. ... Thank you, I'll be here all week. Tip your server.)

Over the Christmas break, I was tinkering with "The Price of Victory" at my computer when I smacked myself in the head. Idea! Why not set up a table using my 15mm figures and scenery that have been languishing in a box for ages? For some reason, pushing metal about a table gives a better perspective than pushing a pencil across paper.

After a few games of tinkering solo, I had myself a set of rules to play. We gathered together the League (ok, it was just Agent Abel and me, but then we are the League, aren't we?) and got our game on, so to speak. I played Americans the first game and then Germans the second game. Instead of me explaining how the rules work, I'll show you with a bit of an AAR from one of the games.

"Not So Quiet on the Obscure Front"
(The title was my son's idea when he saw the table set up. He's a WWI guy, finding WWII a bit too pedestrian for his tastes. Uh huh. Yep. So he says to us, "So how's the fighting going on the Obscure Front today?" Sigh. I think he takes after his mother. LOL. Anyway, let's begin the game!)

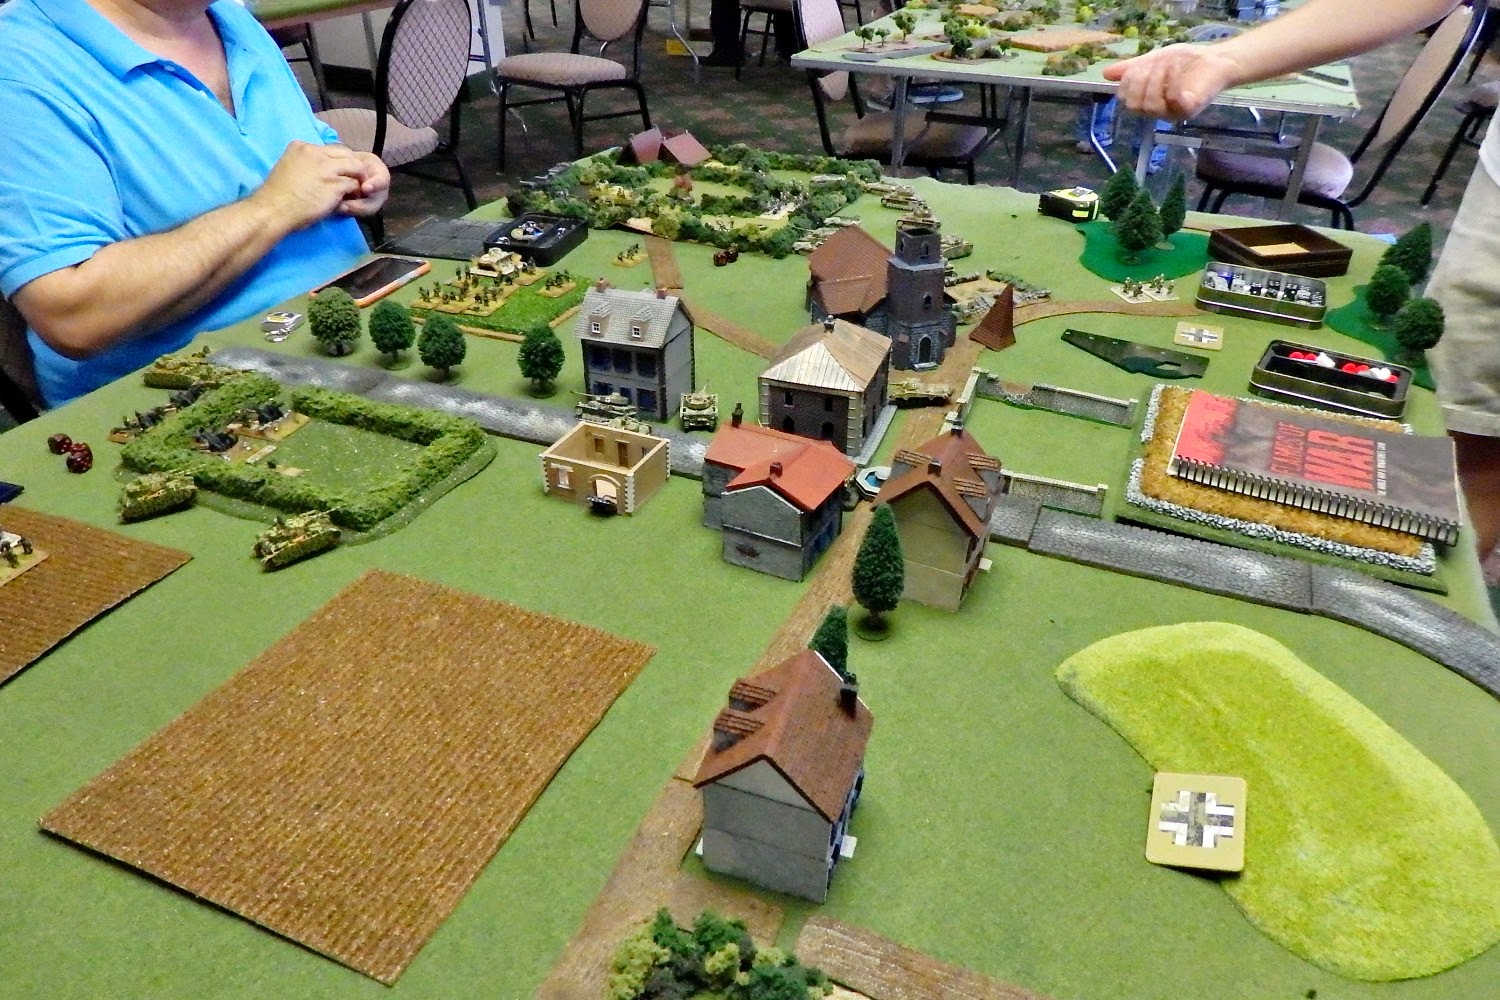
The game is set up. A bit abstract, but sometimes ya gotta work with what ya got.

The Game Turn: The game is a series of turns. There are no phases or anything. Just a turn. When one turn ends, players remove any markers needing to be removes, and a new turn begins. Of course, a lot can happen during a turn!

Units: Each figure is one soldier. Figures form into units based on their nationalities and the time period. A unit could be a single figure, such as a medic, or it could be an entire squad of riflemen with a BAR and SMG tossed in. It doesn't matter. The rules refer to everything as a unit, though sometimes in this AAR I call them squads and such for flavor.

Initiative: Player initiative is playing card driven because it's easy, fun, and oh so chaotic--just like the battlefield. Standard 52-card deck here with two jokers. Flip a card, see who has initiative. Player 1 gets black cards, Player 2 gets red cards, and Jokers end the turn. Simple enough. (Plus, I like collecting playing cards. BTW I have a neat deck of WWII airplane recognition playing cards. I kept my Scooby-do card in the closet.)

Turn 1: Round 1 - American
The American Force: A reinforced Platoon with 6 units
After some friendly banter about who will beat whom, the first initiative card is turned over for the first turn. Black. The American player has the initiative. He is advancing his platoon in V formation through some light wounds on the edge of the village, with 1st and 2nd Squad on point, 3rd Squad in reserve, and a LMG unit looking to set up some fire for support. The Platoon Lt and his Sergeant form the force's Command Unit, which is walking a bit behind but close enough for his messengers to reach his squads. The medic (a 1-figure unit) is hanging by the Command Unit. The American objective is to take and hold the church, which sits in the center of an important crossroads.

The American player announces that he will try to activate one of his infantry units, 1st Squad, to move forward. He needs to roll 7+ on 2d6 to activate the unit. All Regular units activate on 7+. Veteran units on 6+, Elite on 5+, but Green units on 8+. The 1st Squad is within 9" of the Platoon Commander, so he gets a +1 bonus for being within Command Range of his force's commander. The unit is totally fresh, no Combat Fatigue markers or Action markers on it, yet. They're not abandoning any wounded figures to the enemy, so no penalty there. Excellent. Just as it should be on Turn 1! He rolls an 8, adds the + 1 command bonus, for a total of 9. The squad activates, understanding the battleplan to keep advancing for now.

The American player now rolls for movement, which is random. He rolls 2d6 and gets a 1 and 4. Since a unit can move up to the highest rolling die in inches, the unit can move up to 4" as its action, which it does. The unit then ends its action, so the player places a small Action marker next to the unit. (He could use an off-table roster to record this or his memory, but we like to use small markers to make life easier in our old age!)

Turn 1: Round 2 - American
Another initiative card is flipped. Black. American again. Now, the American player could try to activate the 1st Squad again. After all, a unit can perform a maximum of three actions a turn. However, each Action marker will add a -1 die roll penalty to his unit's Activation roll. The American player decides best to keep his force together as best he can before the shooting starts. He makes an Activation roll for 2nd squad, makes the roll, and has the unit move forward. He rolls 2d6 for 3 and 5, discards the 3, and moves 2nd Squad the full 5", just a bit ahead of 1st Squad. He places an Action marker on the unit, ending its activation.

Turn 1: Round 3 - German
Flip an initiative card. Red. German player has initiative. Yipee! Unfortunately, there's not much to do since he is defending in place. He has two infantry squads in place. He is waiting for the third squad to arrive--during their mad rush and confusion to defend the village once they realized the Americans were landing on Normandy they lost sight of the truck carrying the third squad. Hopefully it wasn't captured.

He has divided each of his two infantry units into two independent units--an LMG unit and a rifle unit--giving him a total of four infantry units plus a Command Unit to activate for now. One LMG unit is in the bell tower while its parent rifle unit is in the cemetery to the rear of the church, facing the enemy. The other LMG unit is barricaded in the middle of the street, while its parent unit is in the farmhouse to the lower right. (We pretended that when it arrived prior to the game, the force encountered  brief partisan resistance from the farmhouse, which is easily put down with an assault.)

The German player announces that he will be activating his rifle unit in farmhouse and that they will move across the courtyard toward the far wall. His units are all Regular, just like the American player's units, so he will need to roll 7+ on 2d6 to activate. The unit is too far away from the force's Command Unit, which is in the church cemetery, so no +1 Command bonus this time! No other modifiers apply, so he rolls the dice and gets a total of 3. Ach! (Or, insert your own German cuss word here.) The unit fails its activation roll and is marked as Spent, able to do nothing.

Spent Units: A Spent unit either has performed its maximum of three actions for the turn or fails an Activation roll during the tun. A Spent unit cannot be activated the rest of the turn. In this case, the German player reasoned that his so called soldiers were too busy getting frisky with the house frau and the pantry to hear the orders being barked.

Turns & Time: A turn is only a few minutes of real time, so you can see how this would make sense. Also, now the American player knows that German unit is Spent and cannot activate. The info does him no good since the enemy unit is too far out of sight and range to be any threat for a long time. When a closer unit enemy unit becomes Spent, we rationalize this by saying that our soldiers can tell when something ain't right with the enemy. Why are they not moving? What is going on there? Perhaps the player will take advantage of those Spent enemy units and lay down some fire or try to move through the Spent unit's field of fire while the Spent unit cannot react. Just remember that all movement is random. Initiative is random. The Joker can end a turn at any time. And Activations are rolled for. Push your luck if you like, but be prepared to pay the consequences if your luck runs out!

No Opportunity Fire: Here is where no opportunity fire comes into play because it is baked into the initiative, activation, and movement mechanics. Imagine your opponent decided to move one of his units through your LMG unit's field of fire. One of your opponent's units is caught in the street at the end of its action, not having enough movement to make it into cover because it faltered while moving. (The player rolled double 1s when he needed at least a 3 to reach cover!) Lucky for you, you own the next drawn initiative card. Your LMG has a clear line of fire to the enemy unit in the open--easy pickings. It also has a line of fire to an enemy LMG that has been harassing you from the wood edge, and it looks like another enemy unit is preparing to assault a key objective. Which unit do you shoot at? Or do you withdraw to safer lines while you still can? Perhaps you'll get lucky with initiative draws and activation rolls, being able to act two or three times before the enemy can. Perhaps your opponent will get unlucky again, leaving his unit in the open to activate a different unit. See, it's all about prioritizing decisions. No need for "opportunity fire" rules. It's baked in. It also creates many tense moments!


Turn 1: Round 4 - German
Another red card is drawn, so the Germans have the initiative again. Still waiting and watching what the Americans will do, the German player is down to three units since the one unit is Spent for the turn: his Command Unit, his LMG unit in the tower, and his rifle unit in the cemetery. He decides to give his rifle unit in the cemetery a Pass action, which automatically gives the unit an Action marker, ending its activation for the round but keeping it available until later in the turn, when it might be needed,

At Will Actions: He also had the option of giving one of his units an At Will action. However, there was no need just yet. There are only two At Will actions: Rally and First Aid. Actually, a unit can normally perform either of these actions when rolling to activate. However, when a player says a unit will perform one of these two actions as an At Will action, that can be the one and only action that the unit performs that turn.

So why bother then Rallying a unit only once as an At Will action when you could possibly Rally a unit three times in a turn? Well, how lucky do you feel and how desperate is the situation? There might be times that a unit suffers so many Combat Fatigue markers from taking fire that there is practically no way to activate the unit. For every two of those markers, which we shorten to Fatigue, gives the unit a -1 die roll penalty on its activation roll. Five Fatigure would incur a -2 penalty. So taking one guaranteed action to Rally off the Fatigue might be a good decision. Just another one of those decisions you'll have to make--push your luck and keep firing on the enemy instead of trying to Rally off those couple Fatigue markers, hoping to eliminate him before your boys become shot up again and take more casualties? You decide. (We'll cover Fatigue next time when we get into combat.)

First Aid does not remove Fatigue. Instead, the soldiers in the unit take a few moments to try patching up all their Wounded comrades. If lucky, their wounds will be lighter than thought so the soldier can return to action or be patched up enough as to not be a burden, finding a safe spot to wait out the action for more help. (Leaving wounded soldiers behind while withdrawing from an enemy is not a good idea! The other soldiers in the unit might not like that, refusing to move.) A nearby Medic Unit might help increase the odds. If unlucky, the soldier dies from his wounds and is removed from the game. Still, it's always good to check. But when is a good time for First Aid? That is another decision to make?

Turn 1: The Rest of the Turn
Play keeps going like this. Initiative cards are drawn, players try to activate units, some units activate while others fail. The American player keeps most his force together, though 3rd Squad tends to lag behind. His Command Unit advances in step with the other two rifle units and the LMG unit. The German player bides his time, passing for the first turn. Unfortunately, he wishes the first unit he tried to activate were better at following orders, but such is the Fog of War. Better luck next turn.

Command Unit Activation: This is a good time to mention Command Units. A Command Unit does not need to roll for Acivation. It does so automatically and can do so up to three times, like any other infantry unit. However, Command Units do little other than moving. Their job is to make sure the troops are carrying out the battle plan. Command Units on their own cannot attack or be attacked by direct fire. (They can be attacked by snipers and indirect fire, but that is another issue.) They can attach to a unit, which helps the unit during Rally attempts more so than it would being near the unit. Once attached to a unit, the commander can begin attacking, but it can also be attacked. So attaching can be risky, though sometimes one must lead from the front.

End of Turn: The turn ends when a Joker is revealed or there are no more units left to activate, or when both players say that their remaining units are doing nothing but passing anyway, such as when there are only Command Units left that are going nowhere.

The Americans at end of Turn 1. Not too bad. Unfortunately, the LMG unit is lagging a bit.

So here is where we leave it. In this post you got to see how the activation and movement works. You also got a glimpse and command and control and well as some decisions players will have to make.

The Thrilling Next Installment!
The next installment will continue the game and rules (as I find time to write the post!). The Americans will continue their advance, probably coming into weapons range real soon. Will they be able to find the enemy, fix him with fire, and then flank him? Will the German reinforcements arrive in time? Will that German squad ever get out of the farmhouse? Will their three machineguns make small work of the American's advance, repelling them back to the beaches? We will see in the next thrilling installment of "The Price of Victory," when we look at how combat works.

Thursday, January 2, 2014

Making Quick & Easy 15mm Barbed Wire

Christmas week, I began playtesting some ideas I've had for my own platoon-level WWII rules. Setting up the table using my limited 15mm scenery, I thought it would nice to have some barbed wire to block some of the streets. Unfortunately, I don't have any 15mm barbed wire. Then inspiration struck! I grabbed some spare cheap picture wire I had tossed in my tool box, wrapped the wire around a pencil, and got instant barbed wire. You can see it in the photo below next to some other scenery and figures for scale. It looked good on my make-shift table. Plus, it didn't prick the fingers! :-)


Wishing us all a happy new year!

Monday, December 31, 2012

15mm Zvezda WWII German Opel Blitz

Earlier this year I picked up a pair of Zvezda'a 1/100 scale WWII German Opel Blitz trucks to use in skirmish games with my Peter Pig figures. The kits sat and sat in the closet until Saturday afternoon, when I finally decided to put one of them together.

Operation Barbarossa 1941
Zvezda is well known for making excellent 1/72 scale figures and has been one of the main forces driving my constant interest in that scale. The Opel Blitz truck, along with other German and Russian vehicles and armor, is designed for Zvezda's line of WWII board games. The figures and artillery are 1/72, the vehicles are 1/100, and the  planes are 1/44.

Not Normal Styrene Plastic
The plastic Zvezda uses for the Opel Blitz is not hard styrene like you would find in other armor kits. Instead, it's a medium-density plastic more akin to the kind used in plastic 1/72 figures. As a result, it flexes a bit and can be a bit trickier to cut and trim. There was only minimal flash at spots that cleaned up easily. I used my sprue cutter to remove the pieces from the sprue and a fresh #11 Xacto blade to clean up what remained. Just watch out for feathering the plastic. Since the plastic is soft, I also discovered the hard way that filing and sanding didn't work too well. The kit is "snap-tite," but I still glued the pieces after test fitting them. Testors liquid cement worked great.

Building the Kit
The kit instructions are all visual and dead easy to follow. The kits builds easily enough but does not have anything near the quality of a 1/72 kit from Dragon or, I would guess, a 15mm kit from Plastic Soldier Company. After all, these little Zvezda trucks are meant as game pieces a 12-year old can snap together easily. As a result, the cab section has slight gaps where some of the pieces meet. I tried clamping these pieces after gluing them, but had only slight luck with the gaps. Oh well. I can't complain too much for $3. While in the box, some of the undercarriage struts got badly bent to the point of breaking. I made sure to glue each strut to the bottom of the truck bed. Because the truck flexed a bit, I also glued the back of the cab to the front of the bed, which stopped that from happening. I left the canopy unglued so I could remove it from the bed when needed.

What's Next to Do
The next step is to wash the kit in soapy water (I forgot to do this when on the sprue!) and paint it. The kit comes with a stat card for the game but doesn't include any decals. I assume finding some decals won't be hard

So there you go. A nice cheap kit you can use as an objective or just plain line-of-sight-blocking scenery. I plan to use at least one truck as an objective as in Call of Duty 2-player missions, such as somewhere in the town is a truck loaded with explosives. Find it and destroy it before it's too late. Or steal the Nazi's hoard of gold, load it into the truck, and drive off into the sunset. Wait a minute. That last bit wasn't in Call of Duty 2, was it? ;-)

Have a Happy New Year!

Of course, I only thought of snapping some photos midway into the project. So here you can see the box, instructions, and my progress at the moment. I'm using my OTT lamp for lighting. I always use a folded vinyl tablecloth when painting and modeling. It cushions my forearms, helping to prevent pain..See, I have pinched nerves in my elbows, along with carpal tunnel in both hands, a bone defect in my right hand causing tendon pain if I move it left and right, and plain old shaky hands. My son says my entire life is irony--the last thing I should be doing is modeling and painting figures! (If you watch me build models or paint, you'll hear me mutter mantras like "hold still," "don't shake," and "that's what they make touch up paint for." Wow, this was a long photo caption that got a bit derailed!

Assembled at last! All in all, it took me only 30 minutes of easy work, and I worked slowly.

Game angle view of truck and a Peter Pig figure. Looks fine from this angle.

From the side, the based figure is a bit taller than it should be, but gamers are used to this when using unbased vehicles. These vehicles will fit perfectly with my 1/100 Landmark buildings.

Thursday, December 27, 2012

Next Gaming Project: Girls und Panzer

I have just discovered my next gaming project: the new Japanese anime series Girls und Panzer. I got my inspiration from today's email from Dragon Models USA, announcing the release of their new 1/35 kits for some of the tanks from the show in their Platz Models range. My current favorite is the red Stug with the banners, though I really wish they had the pink M3 Lee. There is just something special about school girls driving a pink tank into battle. Ok, I'm being silly. But these are real models for a real TV series. I don't build 1/35 kits, but if they were 1/72 diecast I probably would get them just for kicks. Come to think about it, Girls und Panzer just might make an interesting convention game.... I am so doomed. 


The Pink M3 Lee

Tuesday, October 30, 2012

Painting WWII Soviet Infantry - Part 6C:
Finished Black Tree Design 28mm Infantry

Articles In This Series
Part 1: Series Introduction, Plus Ranks & Insignia
Part 2: Summer Tunics & Trousers
Part 3: Basing Tips & Tricks
Part 4: Winter Uniforms
Part 5: Painting Guides
Part 6A: Finished Black Tree Design 28mm Infantry
Part 6B: Finished Black Tree Design 28mm Infantry
Part 6C: Finished Black Tree Design 28mm Infantry

This is the final installment in this series of articles on painting 28mm Soviet WWII miniatures. I've enjoyed writing the articles for this project, and by the looks of it if many of you guys also have enjoyed the project. A big thank you to everyone! I have more articles I'd like to post, such as one dealing with good Soviet WWII reference books and using paper building models for urban WWII fighting, but they will be stand-alones. Always something to blog about! Now I just need to find time and motivation. :-)

Two Photos Below: So here are the last of the painted miniatures. These are the helmeted soldiers. While I like the Black Tree Design miniatures, I wish they had more guys wearing medals. The Soviets loved giving out medals. The NCO in the center is wearing a medal for the Battle of Stalingrad. I'll add a bit more scenery material to some of the bases, but I'm going to take Margard's suggestion and not clutter them up.


Photo Below: Here are figures I'm still working on. I have some officers to finish, a scene with guys eating food, some snipers, and a prone LMG crew. As for unprimed miniatures, I have a pack of dismounted tank crew, two Maxim machine gun crews, and a pack of anti-tank rifles. I would also like some female soldiers, but I don't know of anyone doing these in 28mm. I had been a bit exhausted working on this project, but am getting ready to go back and work on it again.

Monday, October 29, 2012

Painting WWII Soviet Infantry - Part 6B:
Finished Black Tree Design 28mm Infantry

Articles In This Series
Part 1: Series Introduction, Plus Ranks & Insignia
Part 2: Summer Tunics & Trousers
Part 3: Basing Tips & Tricks
Part 4: Winter Uniforms
Part 5: Painting Guides
Part 6A: Finished Black Tree Design 28mm Infantry
Part 6B: Finished Black Tree Design 28mm Infantry
Part 6C: Finished Black Tree Design 28mm Infantry

Eight of the Black Tree Design figures I have are wearing the fur hat known at a ushanka. While these hats can come in various shades of browns, greens, greys, and black, I made them all the same color to give them some unity. The NCO is wearing a grey hat to distinguish him from the others. To separate some of the same poses, I painted the top of two figures Reaper Uniform Brown, which had a bad habit of cracking while drying. I also gave the fellow on the far left rear a nice scar on his cheek. The NCO also got a small scar. I'll finish up the pics as soon as possible this week. I wanted to post them last week but got sidetracked with real life, barely having any time on the computer.


Monday, October 22, 2012

Painting WWII Soviet Infantry - Part 6A:
Finished Black Tree Design 28mm Infantry

Articles In This Series
Part 1: Series Introduction, Plus Ranks & Insignia
Part 2: Summer Tunics & Trousers
Part 3: Basing Tips & Tricks
Part 4: Winter Uniforms
Part 5: Painting Guides
Part 6A: Finished Black Tree Design 28mm Infantry
Part 6B: Finished Black Tree Design 28mm Infantry
Part 6C: Finished Black Tree Design 28mm Infantry

Until now, I've been showing odds and ends photos of these figures in various stages of painting. Finally, we have all of them painted and on pretty much done bases. I still need to buy some more autumn flock and debris, but these guys are good enough to start fighting those dirty fascists!


Photo Above: In the foreground, I have four infantry wearing the cloth pilotka hat. Three of them are wielding the deadly but close-range PPSh-41, with one fellow getting ready to throw his grenade and assault. While some gamers dislike kneeling poses, I like having some of them in my skirmish games. The fellow pointing is quite dramatic, and I like the fellow aiming his rifle.

The two figures in the background are bareheaded, of course, but are the exact same pose. I got seven of this pose from the fellow who sold them to me second-hand! Seven bareheaded guys!?! Agh!!! I tried to make these two guys looks as different as possible, but what can you do other than different colored hair? Oh well. I have the other five figures primed in case I meet someone who wants to learn how to paint. I also used one as a test piece to try out some techniques.
 

Photo Above: Here you can see the rear of the figures. It shows some of the various pieces of equipment these figure sport. The figures second and fourth from the left in the foreground have a single flap pouch that I want to think is a PPSh-41 ammo drum pouch or a grenade pouch, hard to tell because this pouch is used on different poses regardless of weapon. I just realized the pouch also looks like a medical bag--this might be something I add later on for a medic figure, just paint a red cross in a white circle! Soviet equipment is so confusing and varied that I no longer lose sleep over it.

You can also see the different painting techniques I was trying and learning, such as how to line the the figures--use a black line? a darker shade color? something else? A little touch I really liked was highlighting the boot heels and soles.


Photo Above - From Left to Right: I really like the drama of the first figure on the left. He looks like the hardened soldier. The second fellow has a rather frightened look befitting his new (aka matching and greener) uniform--how many days will he last in the field?

While I could have painted the officer in standard Soviet infantry colors, I decided to paint him in NKVD colors, which fit into the platoon's shot-to-heck back story I was cooking up in my head. He just isn't standing behind the platoon, ready to shoot anyone who even thinks about retreating. No, he has taken over a command, extending his left hand for his men to begin deploying to his left and right in preparation for the assault. Desperate times, you know.

The final fellow has a PPSh-41 with grenade, looking more like he's going to pass it to someone than throw it. His satchel could be a grenade pouch, but if you look at his rear photo you'll see he has no other equipment--no shovel, canteen, ammo pouch--nothing. Sloppy sculpting from one of the itinerant sculptors of the line or has this solider lost all his gear? You be the judge. (I like to think the latter, but suspect its the previous, hence the weak "here's a grenade for you, comrade" pose.)


Until Next Time: The next post will show the remainder of the platoon, so stay tuned. I hope these photos and the series inspire you to give some Soviets a try.

Tuesday, October 9, 2012

Painting WWII Soviet Infantry - Part 5:
Painting Guides

Articles In This Series
Part 1: Series Introduction, Plus Ranks & Insignia
Part 2: Summer Tunics & Trousers
Part 3: Basing Tips & Tricks
Part 4: Winter Uniforms
Part 5: Painting Guides
Part 6A: Finished Black Tree Design 28mm Infantry
Part 6B: Finished Black Tree Design 28mm Infantry
Part 6C: Finished Black Tree Design 28mm Infantry

Series Overview
This is the fifth in an ongoing series of articles documenting the research I have been doing for painting my 28mm Black Tree Design miniatures for 1:1 skirmish gaming. Finding historical information on Soviet uniforms that gamers can use was very difficult, with much of it scattered across various Osprey and other books, along with some websites. I hope folks find this series of articles helpful and might even stir some interest in gaming the Eastern Front. While I painted 28mm miniatures, nearly all this information is useful for all miniature sizes.

I hope you've been enjoying this series of articles and would love to hear your comments. And if you enjoy gaming the Eastern Front in any scale, please include a link to your blog or online photo pages.

One Size Does Not Fit All
Soviets with a lend-lease jeep with a Browning .50 cal.
While doing the research for painting my Soviets, I came to realize that there was no one correct color of Soviet uniform because of the country's poor quality controls and need for many uniforms quickly. Plus, uniforms quickly faded and changed color once they hit the battlefields. For example, tunics and trousers could range from dark green to light cream, with even some tans and browns tossed in. Equipment also came is many different colors, styles, and materials. It can be quite confusing, as well as very liberating because we needn't worry so much about accuracy as we would when modeling the Western Front.

Since I use 28mm miniatures for 1:1 skirmish games that border on roleplaying games, I wanted my soldiers to have as much individual character as possible and reflect the hard city fighting of Stalingrad and its surroundings. The video game Call of Duty 2 heavily influenced my decision to game Stalingrad.

Some Unity is Important
While I painted the uniforms to reflect the chaotic mishmash look of city fighting, I also wanted them to look like a unified fighting force on the table. Being a modeler all my life, I like to say that we don't model reality but people's idea of what reality is supposed to be. For example, I could have painted the steel helmets and ushanka winter hats all sorts of different colors and shades, which would have been quite realistic for my setting, but I used the hats and helmets to unify the soldiers. This is why I painted all the steel helmets the same shade of green. Same for the ushanka, though I did give a cigar-chomping NCO a grey hat to signify his "special" status.

I begin this post with my own guide I created to paint my figures. I also give you some additional painting guides that you might find useful and more to your liking. Finally, you can also check out the nice WWII painting and camo guides over at Artizan's website.


CPBelt's Soviet Infantry Painting Guide
Here is the comprehensive painting guide I created to paint my infantry so far. It collects the bits from earlier articles and includes a lot of new info. I used Reaper paints because I can get them locally. While I have had some problems with some colors of Reaper paint being too thin or cracking while drying (the Olive triad and Uniform Brown all cracked, along with some others), I really like their Terran Khaki triad. As I paint my remaining figures--such as tankers, snipers, officers, NKVD, sailors, and so on--I'll add that info to this guide.

M35 & M43 Summer Tunics, Trousers, & Pilotka
Unless a soldier was a fresh to the fighting, I often painted the tunic one base color and the trouser a different base color. Often Soviet infantry would take better bits and pieces of uniforms when theirs would wear out. For example, a hardened soldier might have light trousers but a new darker jacket.

Fresh Troops
Highlight: Reaper 9122 Terran Khaki
Base: Reaper 9121 Khaki Shadow
Shade: Folk Art FA449 Olive Green

Veteran Troops
Highlight: Reaper 9123 Khaki Highlight
Base: Reaper 9122 Terran Khaki or Vallejo 988 Khaki
Shade: Reaper 9121 Khaki Shadow

Hardened Troops
Highlight: Reaper 9123 + White
Base: Reaper 9123 Khaki Highlight
Shade: Reaper 9122 Terran Khaki

Poor Quality Conrol Variation
Highlight: Reaper 9127 Uniform Brown + Reaper 9123 Khaki Highlight
Base: Reaper 9127 Uniform Brown
Shade: Americana DA180 Asphaltum

M41 & M43 Winter Uniform
These colors work for both the jacket and trousers.
Highlight: Base + Reaper 9123 Khaki Highlight
Base: Reaper 9162 Driftwood Brown
Shadow (and padding creases): Dark Brown.

Steel Helmet:
Highlight: Base + White
Base: Folk Art FA927 Old Ivy + Folk Art FA449 Olive Green
Shade: Americana DA157 Black Green
Chin Straps: Reaper 9122 Terran Khaki

Ushanka (Fur Hat)
For painting the standard infantry ushanka, you will need the colors below and then follow how I painted the hats. First, I painted the entire ushanka Reaper 9158 Olive Drab and then drybrushed the fur flaps with Reaper 9122 Terrain Khaki and then very lightly drybrushed some Reaper 9123 Khaki Highlight. I then painted the cloth part of the hat using Reaper 9121 Reaper Khaki Shadow, highlighting the edges with Reaper 9122 Terrain Khaki. Finally, I lined the edges of the fur flaps using Reaper 9158 Olive Drab. The last touch is to paint the Soviet stars, touching them up with some black and then simply painting them a shade of bright red, leaving some black along the edge for shading.
Drybrushed: Reaper 9123 Khaki Highlight
Drybrushed: Reaper 9122 Terran Khaki or Vallejo 988 Khaki
Reaper 9121 Khaki Shadow
Reaper 9158 Olive Drab

Blankets
I painted all my blankets using summer tunic colors above. You could also paint them shades of green-grey, maybe a brown, and so on. Again, nothing was standard.

Canvas Gear
This includes cloth grenade satchels, ammo pouches, shovel covers, straps, canteens, backpacks, belts, and anything else made of cloth or cloth webbing. Since there were no real standards, with this equipment coming in all sorts of shades, you can vary the base color as you like, using various khakis and light olive greens. Flap straps could be cloth or leather. I painted buckles a tin color.
Highlight: Reaper 9123 Khaki Highlight
Base: Reaper 9122 Terran Khaki
Shade: Folk Art FA449 Olive Green

Leather Gear
This includes leather belts, straps, and ammo pouches. You really have a wide selection of leather colors to choose from, from reddish leather to brown leather to tan leather. It seems that NCO's and better soldiers got higher quality black leather ammo pouches. From what I can see, belts were never black leather. Below are the three leather variations I used on my figures.
Base v1: Vallejo 940 Saddle Brown
Base v2: Reaper 9030 Leather Brown
Base v3: Reaper 9031 Tanned Leather

Boots
Any black will do.

M43 Shoulder Boards (Summer & Winter Uniforms)
The M43 saw shoulder boards come into fashion, both for summer and winter uniform. The board itself is darker than the uniform and trimmed in a color specific for that branch of service. Infantry shoulder boards, for example, has raspberry colored piping trimming the edges. The button on top of the board is brass.
Shoulder Board Base: Reaper 9121 Khaki Shadow
Shoulder Board Trim: Americana DA276 Razzle Berry

Grenades
Since Soviets practiced assault tactics, they loved their grenades. Again, these could come in many different shades like the uniforms, but I chose to paint them all the same color.
Base: Reaper 9122 Terran Khaki


Panzer Aces Paint Guide
If I remember correctly, this is a guide I took from one of the Panzer Aces series. It uses all Vallejo paints. Some folks might find it useful.

Summer Tunic, Trousers, & Pilotka
Highlight: Base + 914 Green Ocher + 976 Buff
Base: 879 Green Brown + 882 Middlestone
Shade: Base + 872 Chocolate Brown + 950 Black


Winter Padded Jacket & Trousers
Highlight: Base + 976 Buff
Base: 897 Bronze Green with 913 Yellow Ocher
Shade: Base + 872 Chocolate Brown + 950 Black


Cloth Coat
Highlight: Base + 991 Dark Sea Grey
Base: 866 Grey Green + 872 Chocolate Brown
Shade: Base + 950 Black


Steel Helmet
Highlight: Base with 882 Middlestone
Base: 897 Bronze Green
Shade (washed):  950 Black


Ushanka
Highlight: Base with 986 Deck Tan
Base: 886 Green Grey
Shade (washed): 950 Black


Leather Equipment
Highlight: Base + 981 Orange Brown
Base: 984 Flat Brown + 940 Saddle Brown (varnished gloss)
Shade: Base + 950 Black


Canvas Equipment
Highlight: Base + 976 Buff + 951 White
Base: 917 Beige with 881 Yellow Green
Shade: 872 Chocolate Brown


Boots
Highlight: 950 Black + 872 Chocolate Brown
Base: 950 Black (varnished gloss)
Shade: 950 Black


Vallejo Soviet Paint Set
The basic guide below is from Vallejo's Soviet boxed paint set and is for the M43 summer uniform.

Helmet
894 Russian Green or 823 Luftwaffe Camo Green

Greatcoats & Bedrolls
874 USA Tan Earth

SMG Ammo Pouches
983 Flat Earth

Uniform
880 Khaki Grey or 988 Khaki

Boots
950 Black


Sunday, October 7, 2012

Painting WWII Soviet Infantry - Part 4:
Winter Uniforms

Articles In This Series
Part 1: Series Introduction, Plus Ranks & Insignia
Part 2: Summer Tunics & Trousers
Part 3: Basing Tips & Tricks
Part 4: Winter Uniforms
Part 5: Painting Guides
Part 6A: Finished Black Tree Design 28mm Infantry
Part 6B: Finished Black Tree Design 28mm Infantry
Part 6C: Finished Black Tree Design 28mm Infantry

Series Overview
This is the fourth in an ongoing series of articles documenting the research I have been doing for painting my 28mm Black Tree Design miniatures for 1:1 skirmish gaming. Finding historical information on Soviet uniforms that gamers can use was very difficult, with much of it scattered across various Osprey and other books, along with some websites. I hope folks find this series of articles helpful and might even stir some interest in gaming the Eastern Front. While I painted 28mm miniatures, nearly all this information is useful for all miniature sizes.

The M41 and M43 Winter Uniforms
In earlier articles, I focused on Soviet summer uniforms. Now I turn my attention to the padded winter uniforms, which were designed to withstand the brutal cold of the Eastern Front.

There are two main patterns of padded winter uniforms: the M41 introduced in 1941 and the M43 introduced in 1943. Both patterns feature nearly identical padded trousers, called "vatnie sharovari" in Russian. These are so similar that gamers really needn't worry about the details because on 28mm and smaller miniatures one pair of padded trousers looks just like the next pair to my eyes. However, when we look at the winter uniform's padded jackets, called "telogreika" in Russian, we can spot some significant differences between the M41 and M43 patterns.

The M41 Telogreika
The M1 telogreika has the same large, folded-down collars as the M35 summer tunic pattern, which I discussed in Part 2 of the series. Rank insignia are displayed on these collars, as you can see in the drawing of the uniform to the upper left. As I discuss later in this article, most telogreika-clad Soviet WWII miniatures use the M41 pattern.

The M43 Telogreika
The M43 pattern, on the other hand, eliminated the telogreika's large collar, replacing it with a short upstanding collar buttoned at the top. This follows the same collar design as on the M43 summer tunic. As with the M43 summer tunic, senior NCO's wearing the M43 telogreika were to have shoulder boards displaying their rank insignia. However, photos show that many NCO's chose not to wear any sort of shoulder board on their telogreika. The photo to the right clearly shows the M43 telogreika, though the photo looks like a publicity shot because the uniforms and equipment on these soldiers look practically brand new and way too clean to have seen any fighting. (Soviets in WWII were fond of staging publicity photos, including combat photos.)

Mixing and Matching Jackets and Trousers
Because the telogreika was warmer than summer uniform jackets while still allowing a soldier more freedom of movement, soldiers often wore their telogreika in spring and autumn as well as in winter. You can see this in some photos, with soldiers wearing their telogreika and regular (non-padded) wool or cotton trousers, while other soldiers are wearing the full summer uniform.

In fact, on the cover of Red Army Uniforms of World War II in Colour Photographs (1993), you can see the fellow on the right wearing a telogreika along with the summer uniform trousers. By the way, this is a great book, with each page featuring one or more color photos of reenactors in Soviet uniforms. There is also a section of gear. This book has been a valuable asset for me, but its info can be a bit sketchy at times. You can pick up perfectly fine used copies of the book on Amazon for $20.

The Ushanka
Nothing screams Soviet/Russian winter like the ushanka! The ushanka, which means "ear hat" in Russian, is a distinctive feature of Soviet WWII uniforms and remains popular today. (In fact, my nephew up North likes to wear a rather large ushanka. Of course, we in Central Florida have little use for such a hat. But I digress...) Sometimes you might see this hat called a shapka or chapka, but from what I've read WWII uniform books prefer calling them ushanka. These hats come in many colors, from the same color as the uniforms, to shades of brown, to shades of cream, to shades of grey. The Soviet Star on the front flap could be red or gold, though I prefer red for my miniatures. You can tie the ushanka's ear flaps at the top of the hat, pulling the flaps up, or you can lower the flaps over the ears, tying them under the chin to keep you nice and tosty on those cold Stalingrad nights. Pretty nifty and very Soviet-looking!

28mm Miniatures in Winter Uniforms
On the page WWII 28mm Soviet Infantry, I discuss in detail which miniature companies make soldiers clad in winter uniforms and identify the uniform patterns they wear. (Originally, that page started as part of this article but grew too large!) Still, I'll briefly say that Artizan, Black Tree Design, Crusader, Warlord Games, and West Wind figures all wear the M41 telogreika with large collars. The Assault Group and Victory Force figures wear the M43 telogreika with short collar and shoulder boards. Some figures wear padded trousers, while most others wear regular trousers.

Painting Winter Soviet Uniforms
Information about painting Soviet winter uniforms can be found in Part 5 of the series, Painting Guides, which will be posted in a couple of days. I'll also post it as a page. This is a comprehensive list of guides covering all the uniforms covered to date.

Saturday, August 4, 2012

Painting WWII Soviet Infantry - Part 3:
Basing Tips & Tricks

Articles In This Series
Part 1: Series Introduction, Plus Ranks & Insignia
Part 2: Summer Tunics & Trousers
Part 3: Basing Tips & Tricks
Part 4: Winter Uniforms
Part 5: Painting Guides
Part 6A: Finished Black Tree Design 28mm Infantry
Part 6B: Finished Black Tree Design 28mm Infantry
Part 6C: Finished Black Tree Design 28mm Infantry

Series Overview
This is the third in an ongoing series of articles documenting the research I have been doing for painting my 28mm Black Tree Design miniatures for 1:1 skirmish gaming. Finding historical information on Soviet uniforms that gamers can use was very difficult, with much of it scattered across various Osprey and other books, along with some websites. I hope folks find this series of articles helpful and might even stir some interest in gaming the Eastern Front. While I painted 28mm miniatures, nearly all this information is useful for all miniature sizes.

Getting Started With Basing
Having some free time yesterday afternoon, I finally worked some more on the bases of my Black Tree Design Soviets. Several weeks ago, I had smeared Elmer's Wood Filler across the bases. When that dried, I painted the edges of the bases and much of the base itself using Ceramcoat Autumn Brown. When that dried, I sealed the paint on the bases using Americana's brush-on matte varnish, though it dried with more of a shine than I would like. Normally, I would have sprayed the bases with Dulcote, but it's been too humid here in Central Florida. I'll have to do that once the humidity lets up.

Using Ballast (not Sand) as Ground Cover
So yesterday the figures got some ground cover. You can see my set up in the top photo below. For these figures, I used a mixture of fine, medium, and coarse brown ballast from Woodland Scenics. In a small bowl, I mixed some of each. Since I was shooting for a rubble-look, I used more medium and coarse ballast than I normally would have.

Though a few years ago I tried using plain old sand and then painting it, I've found using model railroad ballast works just as well. Plus, model hobby shops sell ballast in many different colors and rock mixtures, not just the few colors that Woodland Scenics offers. Check them out when you get a chance.


This beings me to another point. Why did I use brown ballast if I was thinking of doing city fighting, like in Stalingrad. Wouldn't grey ballast and rocks be better, along with grey painted bases? You know, at first I had been planning on doing just that. Then I began thinking that grey bases would be too limiting, switching to basic brown earth instead. After all, cities have lots of earth, especially around blown up buildings. Earthen bases wouldn't look as out of place in city fighting as grey bases would look in countryside fighting. Kind of trivial, I guess, it was something that ran through my head.

Painting on the Glue
Ok, so I have all my bowls of rocks on the table. I then thin down white glue about 50/50 with the same distilled water/flow improver mix that I use when painting. Using an old brush, I paint the glue onto the base. Here is a little trick I figured out: licking my finger, I rub the ring of the base to get off any excess glue so my base edges don't become rock-covered.

Rock On!
Next, I take the figure and dip it deep into the ballast mixture, swooshing it about. When I pull out the figure from the mix, I make sure to keep the ballast piled on top. I then use an old bristle brush and pat down the pile of ballast, making sure the ballast settles into the glue. I then tap off the excess ballast, rub off any ballast around the edges, and move onto the next figure. This is the easy part, I always feel.

Base Details: Rubble, Rocks, & Grass
Now comes the fun part that make or break the look of a base and its figure. What details do I put on the bases? I want an autumn/early spring look to the figures, after all many are wearing bits of winter uniform. I'd love to do winter bases, but that specialized project will have to wait!

The other containers in the photo have Woodland Scenics coarse brown talus and coarse grey talus, along with some Cajon sandstone rip-rap. What's nice is that these packs also have bits of other rock colors in them, so I can pull them out to look like brick bits maybe. These rocks can be used for nearly any other project as well. Finally, I have some autumn grass tufts from Army Painter. You don't see any static grass because I don't own any autumn colors, only summer farm pasture, which won't work too well here. (Besides, I'll be placing an order with Scenic Express next week for more scenery stuff, like autumn grass.)


You can see in the photo that I experimented a bit with a few figures. A couple of them I glopped on some glue and then dipped them in either the grey or sandstone talus, looking for that pile of rubble look. Some rocks I just glued in place as I felt. I'm not sure if it capture the look of rubble, but since I don't have a bits box of rubble junk, they'll have to do for now. I don't think I'll do this to many of the bases.

When I get my order from Scenic Express, I'll finish the bases on all 25 figures. At least with the ballasted bases they look a lot better than they had look the past several months in their black-primed bases!

Now I just need some buildings, most likely paper, and get these guys onto the table for some gaming. I'll keep you posted.

Saturday, March 3, 2012

Stalingrad For $3: Wargames, Soldiers, and Strategy #28

Keeping with the Soviet theme of late, I downloaded the PDF version of issue #28 of Wargames, Soldiers, and Strategy, paying only $3.05 after conversion from Euro to dollars. Though I began writing this post as a small blurb about the issue and a link to it, it quickly grew into an overview of the issue. Hopefully, folks will find it useful.

I downloaded the issue because a large portion of it, what they call a "dossier," centers around The Battle of Stalingrad during WWII.This is one of those "battles" (more like a protracted siege) that has always fascinated and horrified me since I was a teenager playing boardgames.


Historical Background
There is a 13 page history of the battle, "Stalingrad, The Hero City," complete with maps of the battle and a double-page spread of the city under attack, illustrated with photos of battle-destroyed 28mm buildings and Black Tree Design German and Soviet. I was a bit surprised that actual photos of the battle were not included, but those are easy enough to come by.


Miniature Reviews
Next comes a one-page article on available 20mm and 28mm miniatures. Since the list is five years old, it's getting a bit dated. Still, it's only a page.

Scenarios
Two rules-generic scenarios follow the listing of available miniatures. The first two-page scenario is "Pavlov's House, 29 October 1942." The German forces are elements of the 389th Infantry Division, 6th Army. The scenario calls for a platoon of four infantry squads, five halftracks, a Panzer III, and a Panzer IV. They are attacking only eleven Soviet infantry holding out in Pavlov's house. They also get an AT gun, a couple 50mm mortars, and a dreaded sniper team. Then there is the Soviet minefield to spice it up a bit. To be fair, the Germans also get some mortars. This looks like an interesting defensive battle, the type which occured over and over again in the city.

The second scenario, "Stalingrad Sniper Hunt, 19 November 1942," uses about the same number of German forces against a larger, platoon-sized Soviet force. This one tries to capture the feel of sniper teams lurking about the city, preying on enemy soldiers. Looks pretty interesting as well, though it needs more buildings than the first.

Book Reviews
This is a one-page listing of several books covering the Battle of Stalingrad.


Building Ruined Buildings
From where I sit, this is the best article in the entire issue. Paul Darnell of Touching History fame writes an excellent five-page article about creating ruined buildings and scenery for Stalingrad. The best part is that anyone can do this, not just a master modeler! I have always feared doing an urban game like Stalingrad because I fear making or buying all the buildings I would need. (While building structures and scenery was my primary hobby when I did model railroading, I seem to have pulled away from it as I've gotten older.) Plus, his tips and techniques will work for any ruined buildings, from Mordheim to Normandy. Many process photos help as well. Note that Paul's work also graces the historical article. Sadly, Paul's website seems to be offline for now.

Final Word
While lately I have not always been kind to Wargames, Soldiers, and Strategy, I found this older issue very useful, especially for only $3 in PDF. I recommend it as a nice introduction to Stalingrad.