Saturday, April 28, 2012

Road to Victory 2012: US Reenactors

More photos from last month's reenactment. This time the Americans.


Wednesday, April 25, 2012

Central Florida Air Museums

While working on the latest Flying Tigers post the other day, it suddenly dawned on me that we have some big air museums here in Central Florida. Being more of a railroad and armor guy, knowing very little about aviation, I've never been to any of these museums. I'm hoping to change that this year and visit them, weather and time permitting. Of course, if any of you guys have been to any of these or want to give your input, please drop me a line in the comment section below.

Kissimmee Air Museum (Kissimmee, FL)
Click here to visit each museum's website.
Probably the smallest of the museums is the Kissimmee Air Museum. From their website: "We share Florida’s rich aviation heritage through aircraft displays, educational exhibits, aircraft restoration and exciting training flights in WWII fighter-trainers. Visitors experience aviation first hand as they interact with the planes, pilots and projects; taking a front row seat to an aviation adventure at the Kissimmee airport in the heart of Florida. Guests can experience an authentic WWII fighter-trainer from the front cockpit. Not a simulator but a real WWII airplane with you at the controls!" Admission is only $7 per person, which is cheap enough. Right now, this one is farther down my "to do" list because it's so small.

I got these photos online to show what the museums look like.


Fantasy of Flight (Lakeland, FL)
This is one of the larger museums in the area and seems a bit like a theme park, with an admission of $29 a person. The blurb from their website: "Our stunning Art Deco facility is home to over 40 rare and vintage aircraft, many of which have been restored to flyable condition. But that is just the beginning. We offer a variety of guided tours including visits to our working restoration and maintenance areas. You can take a spin on a state-of-the-art hang glide simulator in our interactive Fun with Flight center for families and climb on board a real B-17 Flying Fortress in a WWII bombing mission." We've past by this a number of times on the way to Lakeland and Tampa, but my wife has never been too interested in it. The price tends to put her off, especially since she has no interest in planes. I think this will be for our second museum visit when she's more used to the museum experience.


Valiant Air Command Warbird Museum (Titusville, FL)
They really need a better website!
This museum strikes me as one of those more down to earth places (pardon the pun!) run by a dedicated group of individuals who care about our heritage instead of making a buck. Their admission is $18 per person. They do an amazing air show every year. Unfortunately, that was last month. (March seems to be a busy month here for historical events!) I think this is the one I'm leaning toward visiting first because my wife loves to go to the beach but rarely gets over there. So we'll be able to take care of lot of interests in one trip. When the wife is happy, everyone is happy. Right? You know I'm right. :-)

Again, the blurb from their homepage: "The Valiant Air Command is a non-profit museum. Presently the Museum has 10 acres of property at the Space Center Executive Airport in Titusville, Florida. The museum displays, maintains and restores all types of aircraft that were indigenous to the world's military Air Forces starting before WW1 to the present. The Main Bay/Display Area contains approximately 30,000 square feet and is wide and high enough to accommodate the wing span and tail assembly of all but the largest bombers. In addition to the main hangar bay, there is an area 15,000 square feet dedicated to the display of memorabilia associated with the 'Valiant' individuals who flew, maintained these aircraft."


Tuesday, April 24, 2012

Flying Tigers on Video

Vintage Flying Tigers Newsreels
 Below are some vintage newsreels of the Flying Tigers AVG folks might find interesting.


Restored P-40 Warhawk in Flying Tigers Colors
This is a very cool video of a restored P-40 taxiing, taking off, and flying. I just love the sound of the engine! Back when I built plastic airplane models and did RC planes, I never built a P-40 for some reason.

Saturday, April 21, 2012

Road to Victory 2012: Flying Tigers AVG

New this year to the show, Peter Colón represented the Flying Tigers American Volunteer Group. The Flying Tigers were an air unit the US government secretly organized in 1941 to help China fight Japan prior to our engagement in the war. Before speaking with Peter, who is a fascinating person to speak with, Jeremy and I knew little about the Flying Tigers. Peter does chaplain reenacting for WWII (Flying Tigers) and the ACW, and is available to give "in character" living history presentations at schools and other events. It was nice of him to come to the Road to Victory program that day instead of heading down to the ACW reenactment in St. Cloud.


Flying Tigers websites Peter recommends:
Flying Tigers AVG (Official)
Flying Tigers AVG Living History Group
Flying Tigers US

    Peter set up a nice table display about the Flying Tigers and spoke to many people that day.


    Peter has a tri-fold brochure about the Flying Tigers AVG and another for chaplains in WWII and the ACW. I scanned these into a PDF for easy viewing. Click on this image to view and download the PDF in GoogleDocs. The PDF is 14MB large. Since it's a tri-fold, start reading on the far right column, then onto the 2nd page, then back to the 1st page.

    Wednesday, April 11, 2012

    Road to Victory 2012: German Weapons

    I forgot to add some of the other German reenactor photos I shot when we first arrived. I have to paint up some snipers, so the top photo will come in handy. And who doesn't like a machine gun? Photos of the American camps and jeeps coming next.


    A German MG34.

    So that's what they kept in the gas mask cans--balsa wood airplanes!

    Monday, April 9, 2012

    How to Apply Decals

    Why This Post?
    Because when it comes to applying decals too many gamers constantly offer bad advice to other gamers, especially on TMP. So I decided to create this page to help other gamers apply decals to their models and figures, as well as to remind myself how it's done. It's really quite easy, but there are some pitfalls that novices always fall into. When this post drops off the blog's homepage, I'll make it into a permanent page in the Dispatches nav bar.

    My Street Creds
    Before I got into miniature gaming, I used to be a model railroader since the age of 12. I became so good at detailing, painting, and decaling locomotives and freight cars that I turned it into a nice business that helped put me through college. Several hobby shops in Eastern Pennsylvania used to sell my models so fast that often I could not keep up with demand. I also used to take private commissions and sell my models at many train shows in PA, NJ, and MD. Over the years, I've gotten to know the owner of Microscale Industries as well as many model railroad manufacturers, helping them create accurate decals and models. So I've literally painted and decaled 100's of models in my life--none of which I ever owned!

    Using Setting Solutions
    Always, always, always apply decals on a glossy surface using a decal setting solution. Even if you are like me and use flat acrylic paints on military models and figures, spray your figures with a coat of gloss varnish made for acrylic paint. Notice that I did not say semi-gloss varnish or Future floor wax or glue or any of those other nutty methods gamers talk about on TMP. I said gloss varnish made for acrylic paint--don't be cheap!

    Why? Decals need a smooth, glossy surface to avoid nasty air bubbles and to allow the setting solutions to bond the decal into the paint, literally turning the decal into paint instead of just gluing it to the surface. Besides, the gloss varnish will nicely protect the model or figure from handling, alays a plus. And don't worry, you'll be applying a few thin layers of Testors Dullcote to the entire model or figure when finished, killing the gloss completely. Tip: always apply spray varnishes in multiple thin coats, not one soaking coat--another novice mistake that can lead to unforeseen problems years in the future.

    3 Types of Setting Solutions
    When it comes to decal setting solutions, you have three choices: Walther's Solvaset, Microscale's Micro-Set, and Microscale's Micro-Sol.

    Micro-Set by Microscale Industries
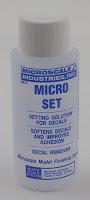
    Micro-Set actually is a weak acetic acid, something along the lines of vinegar without the nasty smell, so to speak. It is the weakest of the three solutions but should be your go-to solution for floating and setting the decals onto the model. Basically, it's a pre-softener for the decal.

    Here is the blub from Microscale's website: "Micro-Set prepares the surface with special wetting agents that cuts the oils in new paint and converts the adhesive on the back of the decal to a stronger and more lasting one. And finally, Micro-Set slightly softens the decals film to make it more flexible so that it can conform better to the model's surface. Better adhesion by the decal to the model prevents tiny air bells from occurring and results in an invisible carrier film or the so called 'painted on look'."


    Solvaset by Walthers
    Solvaset is solvent based and is another version of Micro-Set, so to speak. Walthers made this for the thicker decals of the 1960's and 1970's. As a result, it is stonger than Micro-Set. I used to use Solvaset quite a bit back in the day because I used to used some thick decals as well as thinner decals. Today, all decals are thin. If I were to use this, I would dilute it with water at least 25%. However, if you can get Micro-Set then go with that instead because it's not as harsh as Solvaset and is more forgiving.


    Micro-Sol by Microscale Industries
    Like Solvaset, Micro-Sol is also solvent-based, hence the 'sol' in both products. However, Micro-Sol is a bit weaker than Solvaset. In fact, you may not even need to use Micro-Sol unless the decal will go over rivets or other irregular surfaces. This product literally softens a decal so much that it appears to become paint on the model, conforming to those nasty rivets and such. Now, if a solution can soften a decal that much do you see how mishandling Micro-Sol could ruin a decal and model? Yep, so be careful using it or Solvaset. Only use it once the decal is set or mainly dry (the Micro-Set has been whisked away with the corner of a paper towel). Micro-Sol allows the air under the decal to escape so the decal and paint can bond. Watch how it's done in the videos. And remember, it takes only seconds for Micro-Sol to begin working. Leave it alone! Don't touch the decal until it's dry--even if the decal wrinkles. Wrinkling is normal. It will flatten out. If you have some stubborn bubbles or the decal just hasn't adhered to the rivets, you can always apply some more Micro-Sol until the problem is fixed. Add small amounts at a time so as not to destroy the decal.

    Tip: You can gently prick any stubborn air bubbles using the sharp tip of a fresh Xacto blade--the Micro-Sol will blend the decal film together like magic, providing you didn't butcher the decal when popping the bubbles. Micro-Set can also do this, but if it doesn't work then bring out the Micro-Sol.


    Basic Instructions for Applying  Microscale Waterslide Decals:
    These instructions come from Microscale's FAQ, which you can read at their website.

    1. The object to be decaled must have a clean and relatively smooth glossy surface.

    2. Cut out the Decal lettering and dip in clean water (preferably Distilled water) anywhere from 10 to 20 seconds.  Note:  Some lettering might take a longer soaking time than other sheets.  Set the Decal on a damp paper towel for a short period of time or until the Decal slides freely on the backing paper.

    3. Place Decal where desired on object.  It might be of help if a layer of Micro-Set is brushed on the object first and then place the Decal.  This process will allow the Decal to avoid the Silvering effect that can happen with just the water.  Work as fast as you can in placing the lettering as the Micro-Set starts the wrinkling of the Decal and setting it to the object.

    4. Blot gently around the edges of the Decal with a paper towel or tissue to remove excess water and allow to dry completely.  Add more Micro-Set as necessary over the top of the Decal very carefully.  This process will make the Decal lettering a part of the model.

    5. When placing a Decal on slightly irregular surfaces, use Micro-Sol.  This is the stronger of the two products and aids in soften the Decal to fill the contour, rivets and crevices on the object.  The setting solution also improves adhesion by eliminating the tiny bubbles that can be trapped under the Decal film.

    6. When the Decals are completely dry, it is necessary to wash off the Decal glue and water spots from the object with a damp paper towel or you may brush the water on and then dab it dry.  Do not wipe the Decal lettering.  Drying time may vary, but allow several hours or overnight to before proceeding.

    7. It is recommended that a clear protective coating be applied to the entire surface of the object.  The over spraying of the Decals will protect them from handling and seal the painted surface.

    How To Apply Decals: 


    Sunday, April 8, 2012

    Thrift Store Find: Star Fleet Battles

    Yesterday was great weather here in Central FL. Jeremy and his mom went out shopping for the entire day to Mt. Dora, while I stayed home and worked on the outside of the house for several hours (windows and gardens).

    In the early afternoon, I got an excited phone call from Jeremy. He said that he had found something at a thrift store, and that I would really like it--something from my past. Turns out it was the Star Fleet Battles box below.

    And So It Began
    Back in the late 1970's and early 1980's, we used to go to Virginia Beach for vacation. Aside from the beach and Busch Gardens, I used to go the tidewater area to photograph the Norfolk & Western and the Chessie System. When I got into RPG's, I began going to one of my all-time favorite game stores: Campaign Headquarters in Newport News. That is where I bought the deluxe edition boxed set of SFB, plus some expansions and Captain's Logs.

    And so, like many others back then, my SFB obsession began! Like a true SFB player, I just had to buy everything SFB--and try to use it. Then, like every true SFB player, I burned out on the game. It became too bloated and complicated. Then college and girls entered my life. SFB went onto the shelf, never to be played again.

    Gone...All Gone!
    Sadly, when we moved 15 years ago from PA to FL, I left all my wargames, miniatures, and RPG's behind because I was no longer playing games and my wife worried they would be a 'bad influence' on Jeremy, who was 6 years old at the time. Of course, I came to regret that decision several years later! Every now and then, I get physically depressed thinking about all my gone games. Jeremy knows this. That's why he was so excited to find this set. We had a fun time last evening looking through it and telling some old tales.

    Now I feel this urge to buy the newest version of the game. Someone, please tell me that would be a mistake! :-)

    Look at that stack of ship sheets! I used to put them in plastic sheet holders and use grease pencils to mark off the boxes. Ahhhh...the endless nightmare of energy allocation and shields being sanded down. (I wrote a computer program to handle damage rolls. which sped up the game a bit.) And look at those teeny, primitive counters! Shortly after buying the game back then, I quickly ditched counters and went with the miniature ships.

    Believe it or not, I've never looked at a Nexus magazine until yesterday. Wow, our hobby was so primitive back then, but loads of fun. On the bottom of the box, much to Jeremy's surprise, we found Nexus and some old adverts, which I loved looking through to see what I had owned and had wanted to buy but never did. Man, but I wanted a copy of Warsaw Pact back then! I did have the Traps and Citybook books, plus some other games, like The Barbarian. Good times. Good times. I loved 1982.

    Saturday, April 7, 2012

    Road to Victory 2012: Intro & German Entrenchments

    We had a great time last month at this year's Road to Victory military reenactment benefiting the planned Central Florida World War II Museum. The weather was warmer than normal, but clouds and a strong breeze make the day comfortable. There weren't as many reenactors and spectators there on Saturday as there had been last year because just south of us in Saint Cloud was a large ACW reenactment that same weekend. (I wished I could have been at both the same day!) I'm not sure how or why two large events were scheduled for the same weekend, but it seemed to cannibalize the RtV event quite a bit. (To see photos from last year's RtV, check the WWII Reference link in the Archives.)

    So What Was Different This Year?
    Quite a bit was different, which often is needed to keep everything fresh and fun. I was happy to see a much better food service than last year, with a large area for grilled hot dogs and hamburgers. The funnel cakes were back as well--yum! Still, they need some tables and chairs for folks to eat at. But that is a minor gripe.

    On the reenactment side, the ACW fellows were missing from our show, preferring to spend their time down in Saint Cloud, which is understandable. I'm sure the local subdivision didn't miss the ACW artillery setting off the car alarms all day! The M-8 Greyhound was missing, but there were more awesome jeeps than last year.

    This year, for a donation, you could have the Germans arrest someone and hold them prisoner for a while. The German officer would suddenly pull up in his motorcycle, accost the accused 'criminal,' toss him in the sidecar, berate him endlessly, and then haul him off to the 'jail' (aka food stand tent), while taking a rather lengthy trip around the reenactment. Sadly, we didn't learn about the motorcycle part until just before the battle, which ended the day for us because rain was coming, otherwise we would have done it.

    A few new organizations also set up this year. I'll be posting info about them as well, including photos of a highly-detailed 1/72 Gato submarine. I think you'll like that!

    Anyway, I only have a little time this weekend to post something, so onto some photos!


    German Entrenchments
    When we arrived for the opening at 10am, we popped over to the German encampment, which was much more interesting than last year. Here we see some young Germans digging entrenchments for their machineguns, laying land mines, and stinging barbed wire  Yes, they dug those holes by hand! They didn't use them for Saturday's battle, which was on the other side of the field.