We had a great time last month at this year's Road to Victory military reenactment benefiting the planned Central Florida World War II Museum. The weather was warmer than normal, but clouds and a strong breeze make the day comfortable. There weren't as many reenactors and spectators there on Saturday as there had been last year because just south of us in Saint Cloud was a large ACW reenactment that same weekend. (I wished I could have been at both the same day!) I'm not sure how or why two large events were scheduled for the same weekend, but it seemed to cannibalize the RtV event quite a bit. (To see photos from last year's RtV, check the WWII Reference link in the Archives.)
So What Was Different This Year?
Quite a bit was different, which often is needed to keep everything fresh and fun. I was happy to see a much better food service than last year, with a large area for grilled hot dogs and hamburgers. The funnel cakes were back as well--yum! Still, they need some tables and chairs for folks to eat at. But that is a minor gripe.
On the reenactment side, the ACW fellows were missing from our show, preferring to spend their time down in Saint Cloud, which is understandable. I'm sure the local subdivision didn't miss the ACW artillery setting off the car alarms all day! The M-8 Greyhound was missing, but there were more awesome jeeps than last year.
This year, for a donation, you could have the Germans arrest someone and hold them prisoner for a while. The German officer would suddenly pull up in his motorcycle, accost the accused 'criminal,' toss him in the sidecar, berate him endlessly, and then haul him off to the 'jail' (aka food stand tent), while taking a rather lengthy trip around the reenactment. Sadly, we didn't learn about the motorcycle part until just before the battle, which ended the day for us because rain was coming, otherwise we would have done it.
A few new organizations also set up this year. I'll be posting info about them as well, including photos of a highly-detailed 1/72 Gato submarine. I think you'll like that!
Anyway, I only have a little time this weekend to post something, so onto some photos!
German Entrenchments
When we arrived for the opening at 10am, we popped over to the German encampment, which was much more interesting than last year. Here we see some young Germans digging entrenchments for their machineguns, laying land mines, and stinging barbed wire Yes, they dug those holes by hand! They didn't use them for Saturday's battle, which was on the other side of the field.
Saturday, April 7, 2012
Tuesday, March 27, 2012
Painting WWII Soviet Infantry - Part 1:
Series Introduction, Plus Ranks & Insignia
Articles In This Series
Part 1: Series Introduction, Plus Ranks & Insignia
Part 2: Summer Tunics & Trousers
Part 3: Basing Tips & Tricks
Part 4: Winter Uniforms
Part 5: Painting Guides
Part 6A: Finished Black Tree Design 28mm Infantry
Part 6B: Finished Black Tree Design 28mm Infantry
Part 6C: Finished Black Tree Design 28mm Infantry
Series Overview
I think we all can agree that researching World War II uniforms for the Western Allies (United States and Great Britain) and Germany is far easier than it is for the Soviet Union. It seems that ever since the war ended most people have been far more interested in these three armies than the Soviets, perhaps because the Soviets had been more an "enemy of my enemy," as witnessed by the ensuing Cold War. How many WWII movies are about Soviet battles? How many are about the other Allies? I rest my case.
The end result is that gamers like myself who are unfamiliar with the Red Army can have a difficult time sifting through the different historical books and reenactor sites trying to figure our how to paint our figures and understand how the Soviet army operated.
In January 2011, when I began examining my Black Tree Design Soviet figures and then researching the uniforms, I quickly discovered that the original sculptor for most of the line, Nick Collier, was a fanatic for detail. I'm sure he sculpted just about every Soviet uniform and equipment variation in existence. My head felt like it was going to explode!
Do It For The Gamers!
In order to make life a bit easier for the newbie WWII Soviet gamer and finally organize all my scattered notes before I lose them, I decided to begin writing this series of articles about spotting and painting Soviet uniforms. I'm not sure how long it will take me to complete the entire series. Part 1 has taken me over seven hours to write. Though my focus will be on painting my BTD figures, you can use these articles regardless of the scale you're gaming or the figure manufacturer you're using. Okay, let's get this thing started!
Some Background on Soviet Ranks Being Abolished
Whenever a revolution takes place, it seems as if the new powers-that-be always want to make their own mark on the military, expunging remnants of the previous regime. No where was this more dramatically demonstrated than in the Soviet Union after the revolution and civil war. For example, throughout the 1920's and into the 1930's as a political statement, the Revolutionary Council abolished all military and civil ranks, along with their privileges and honors. Of course, chaos quickly ensued. How could an army operate effectively without its command hierarchy displayed on uniforms? No one had thought of that little detail.
By 1935 the failed experiment ended. Officers, but not generals, had their titles and ranks restored, along with new, military-looking uniforms. Various branches of the armed forces, such as air and armor, began getting their own uniform patterns. By May 1940, all rank titles had been restored, along with parade and undress uniforms. All this occurred just in time for Operation Barbarossa, the German invasion of the Soviet Union on June 22, 1941.
Ranks Restored and a New Uniform: M35
For those gaming Soviets in World War II, there are two basic uniform styles, along with variations of each style. The earliest uniform is the M35 pattern, introduced in early December 1935, though it didn't see wide distribution until early 1936. This is the pattern reintroducing ranks into the Red Army. Based upon the traditional peasant's loose-fitting blouse and baggy trousers, this Soviet uniform was both simple and, from what I have read, more comfortable than the traditional uniforms of the Western Allies. The M35 was issued until 1943, when it was replaced with the M43 pattern. I'll try to explain some of the spotting features of the M35 and M43 patterns along with variations so that gamers can accurately paint and spot them.
We'll begin by exploring the uniform's tunic, called a "gimnasterka" in Russian. Both the M35 and M43 share the same basic tunic pattern, except that both have significantly different collars and rank insignia.
To the left, you can see a photo of an M35 collar. This is a traditional fold-down color buttoned at the top. The top photo shows how the newly restored ranks were displayed by placing an insignia (patch) on the collar.
Each branch of the military had its own facing color and piping color. Officers, though, had different piping colors from enlisted men. Each branch also had its own brass badge on the upper-end of the patch. For example, the upper photo shows an enlisted private (aka Red Army Trooper), whose insignia is raspberry for the infantry, trimmed with black piping for enlisted men, and topped with brass crossed rifles on a target for the infantry. Armored troops, for example, had black facings on their insignia, trimmed with red piping, with a brass tank, its gun facing right. See the Rank & Insignia Guides at the bottom of the post for more information about other branches and ranks in the military.
Officially, the Soviets used facing colors and trim on their insignia until July 1940, when they were replaced with subdued insignia, as seen on the lower photo. The subdued insignias still had the same brass badges for each branch, but the facing color was changed to a darker drab green. Gone was the piping trim. This lasted until the introduction of the M43 uniform.
If your games take place from 1941 onward, as they most likely will, most of your soldiers wearing the M35 uniform should have subdued insignia. Since the Soviets often were slow to reissue uniforms earlier in the war, you could still have a very few soldiers wearing the old colorful patches. I painted all my M35 uniforms with subdued insignia.
However, I had very few BTD figures where I could actually see the M35 collar. In the photo to the left, you can see the figure on the far left and the figure on the far right are wearing the M35 uniform. Every figure wearing this uniform pattern in my collection has most of its collar blocked by either a strap, chin, or blanket. When I had to paint the subdued insignia, the figure usually was wearing the winter jacket, which is a topic for a later post.
Ranks and the M43 Uniform
Compared to the M35, the M43 uniform appears to radically change the way ranks are displayed. However, and quite ironically, the M43 returns to the way ranks were displayed in the deposed Tsarist army--shoulder boards. The collar on the M43 also returns to a more traditional standing collar with two buttons.
The boards on infantry uniforms are the same drab green used on the M34's subdued insignia. The piping trim also follows the same colors as the earlier insignia, such as raspberry for the infantry. When painting the piping, notice that it does not cover the edge along the shoulder. It only covers the two outer edges and the edge along the neck. The button at the top of the shoulder board is the same color as the rest of the buttons on the tunic. The branch badge will go next to the button toward the shoulder. (The photo to the left doesn't show this, but the insignia guides below do.) Additional piping now is also used to identify ranks, such as corporals and lieutenants.
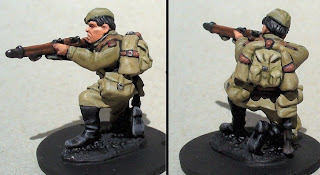
Though shoulder boards were reintroduced on the M43 uniform, the Soviets in 1943 also began removing collar insignia on M35 uniforms still in use, adding the shoulder boards to them. If you look at Black Tree Design's Soviets, you'll notice that some of them are wearing the M35 with shoulder boards. As a result. any figure with shoulder boards won't be accurate for battles prior to the introduction of the M43 uniform.
Luckily, I'm not much of a stickler for such detailed authenticity in my gaming, preferring to have fun instead of creating museum dioramas. I only have some much money to spend and time to devote to painting.Though I mention the branch badges, I haven't painted any of them on my figures--the badges are just too small to paint, looking more like blobs than crossed rifles on a target.
Rank & Insignia Guides
I don't remember where I got the guides below, but I have found them to be very useful for painting my Soviet infantry, most of whom are lowly Red Army Troopers.
Future Articles in the Series
In Part II, we'll look at more spotting difference between the M35 and M43 uniform from a gamer's perspective, and painting the tunics. In future installments, I also want to cover trousers and boots, along with an assortment of straps, gear, and then weaponry. We'll also look at the winter uniforms. Of course, this will all take time, so please be patient.
Well, I hope you have enjoyed this first installment of the series and find it useful. And to think that I still have to paint my officers, Maxim machine gunners, tankers, snipers, NKVD, and more--and then write those articles!
Part 1: Series Introduction, Plus Ranks & Insignia
Part 2: Summer Tunics & Trousers
Part 3: Basing Tips & Tricks
Part 4: Winter Uniforms
Part 5: Painting Guides
Part 6A: Finished Black Tree Design 28mm Infantry
Part 6B: Finished Black Tree Design 28mm Infantry
Part 6C: Finished Black Tree Design 28mm Infantry
Series Overview
I think we all can agree that researching World War II uniforms for the Western Allies (United States and Great Britain) and Germany is far easier than it is for the Soviet Union. It seems that ever since the war ended most people have been far more interested in these three armies than the Soviets, perhaps because the Soviets had been more an "enemy of my enemy," as witnessed by the ensuing Cold War. How many WWII movies are about Soviet battles? How many are about the other Allies? I rest my case.
The end result is that gamers like myself who are unfamiliar with the Red Army can have a difficult time sifting through the different historical books and reenactor sites trying to figure our how to paint our figures and understand how the Soviet army operated.
In January 2011, when I began examining my Black Tree Design Soviet figures and then researching the uniforms, I quickly discovered that the original sculptor for most of the line, Nick Collier, was a fanatic for detail. I'm sure he sculpted just about every Soviet uniform and equipment variation in existence. My head felt like it was going to explode!
Do It For The Gamers!
In order to make life a bit easier for the newbie WWII Soviet gamer and finally organize all my scattered notes before I lose them, I decided to begin writing this series of articles about spotting and painting Soviet uniforms. I'm not sure how long it will take me to complete the entire series. Part 1 has taken me over seven hours to write. Though my focus will be on painting my BTD figures, you can use these articles regardless of the scale you're gaming or the figure manufacturer you're using. Okay, let's get this thing started!
Some Background on Soviet Ranks Being Abolished
Whenever a revolution takes place, it seems as if the new powers-that-be always want to make their own mark on the military, expunging remnants of the previous regime. No where was this more dramatically demonstrated than in the Soviet Union after the revolution and civil war. For example, throughout the 1920's and into the 1930's as a political statement, the Revolutionary Council abolished all military and civil ranks, along with their privileges and honors. Of course, chaos quickly ensued. How could an army operate effectively without its command hierarchy displayed on uniforms? No one had thought of that little detail.
By 1935 the failed experiment ended. Officers, but not generals, had their titles and ranks restored, along with new, military-looking uniforms. Various branches of the armed forces, such as air and armor, began getting their own uniform patterns. By May 1940, all rank titles had been restored, along with parade and undress uniforms. All this occurred just in time for Operation Barbarossa, the German invasion of the Soviet Union on June 22, 1941.
Ranks Restored and a New Uniform: M35
For those gaming Soviets in World War II, there are two basic uniform styles, along with variations of each style. The earliest uniform is the M35 pattern, introduced in early December 1935, though it didn't see wide distribution until early 1936. This is the pattern reintroducing ranks into the Red Army. Based upon the traditional peasant's loose-fitting blouse and baggy trousers, this Soviet uniform was both simple and, from what I have read, more comfortable than the traditional uniforms of the Western Allies. The M35 was issued until 1943, when it was replaced with the M43 pattern. I'll try to explain some of the spotting features of the M35 and M43 patterns along with variations so that gamers can accurately paint and spot them.
![]() | |
| M35 Collars & Insignia |
To the left, you can see a photo of an M35 collar. This is a traditional fold-down color buttoned at the top. The top photo shows how the newly restored ranks were displayed by placing an insignia (patch) on the collar.
Each branch of the military had its own facing color and piping color. Officers, though, had different piping colors from enlisted men. Each branch also had its own brass badge on the upper-end of the patch. For example, the upper photo shows an enlisted private (aka Red Army Trooper), whose insignia is raspberry for the infantry, trimmed with black piping for enlisted men, and topped with brass crossed rifles on a target for the infantry. Armored troops, for example, had black facings on their insignia, trimmed with red piping, with a brass tank, its gun facing right. See the Rank & Insignia Guides at the bottom of the post for more information about other branches and ranks in the military.
Officially, the Soviets used facing colors and trim on their insignia until July 1940, when they were replaced with subdued insignia, as seen on the lower photo. The subdued insignias still had the same brass badges for each branch, but the facing color was changed to a darker drab green. Gone was the piping trim. This lasted until the introduction of the M43 uniform.If your games take place from 1941 onward, as they most likely will, most of your soldiers wearing the M35 uniform should have subdued insignia. Since the Soviets often were slow to reissue uniforms earlier in the war, you could still have a very few soldiers wearing the old colorful patches. I painted all my M35 uniforms with subdued insignia.
![]() |
| M35 to left and right. |
Ranks and the M43 Uniform
Compared to the M35, the M43 uniform appears to radically change the way ranks are displayed. However, and quite ironically, the M43 returns to the way ranks were displayed in the deposed Tsarist army--shoulder boards. The collar on the M43 also returns to a more traditional standing collar with two buttons.
The boards on infantry uniforms are the same drab green used on the M34's subdued insignia. The piping trim also follows the same colors as the earlier insignia, such as raspberry for the infantry. When painting the piping, notice that it does not cover the edge along the shoulder. It only covers the two outer edges and the edge along the neck. The button at the top of the shoulder board is the same color as the rest of the buttons on the tunic. The branch badge will go next to the button toward the shoulder. (The photo to the left doesn't show this, but the insignia guides below do.) Additional piping now is also used to identify ranks, such as corporals and lieutenants.
![]() |
| M35 uniform with M43 shoulder board insignia. |
Luckily, I'm not much of a stickler for such detailed authenticity in my gaming, preferring to have fun instead of creating museum dioramas. I only have some much money to spend and time to devote to painting.Though I mention the branch badges, I haven't painted any of them on my figures--the badges are just too small to paint, looking more like blobs than crossed rifles on a target.
Rank & Insignia Guides
I don't remember where I got the guides below, but I have found them to be very useful for painting my Soviet infantry, most of whom are lowly Red Army Troopers.
In Part II, we'll look at more spotting difference between the M35 and M43 uniform from a gamer's perspective, and painting the tunics. In future installments, I also want to cover trousers and boots, along with an assortment of straps, gear, and then weaponry. We'll also look at the winter uniforms. Of course, this will all take time, so please be patient.
Tuesday, March 20, 2012
Victorian Painting Guide: Gentleman's Emporium
On Sunday afternoon, I finished off another cowboy and began painting my packs of West Wind's London Thugs and London Mob. I also finished the last figure in the London Gentlemen pack. However, when it comes to Victorian clothing, I'm no expert. So, like most people, I look online!When it comes to researching Victorian clothing, I have found Gentleman's Emporium, a Victorian and
Western reenactor dealer, to be of utmost help, even if their store name conjures images of pole-dancing. Plenty of ideas for painting clothing. Plus. their section of full outfits reads like an novel, with named character's and their backgrounds--very handy for playing RPGs or skirmish games! Finally, they have a nifty steampunk section as well. Check them out.
BTW it seems they don't like people saving their photos, but Firefox gets around their javascript no problem. Just right click on the image, when their blocking script tell you they want permission just click "OK," and then the normal right-click menu will come up. Click "save image as" and you have the image. Easy enough!
Sunday, March 18, 2012
Black Tree Design Soviet Progress Photos
Knowing that I won't have much time today for posting to the blog, I thought I'd put together a little series of progress photos that I cooked up last night when I wrote this post.. I don't consider myself an awesome painter, but I have enjoyed learning how to paint figures. Working on a large number of figures at once the past 14 months, has allowed me to experiment and slowly improve. In many ways, not having to finish figures quickly so I could get them on the game table worked to my advantage. I was able to slow down, read painting articles, watch painting videos, deconstruct photos of minis, and experiment at my own pace. And then repaint my many mistakes! (Don't talk to me about repainting Soviet helmets and the correct color for "Russian Green"!) I'm no Golden Demon painter, but I like to think I'm better than I was I began. I guess that's all we can ask for. Ok, enough pondering. On to some photos!
![]() |
| The final product, minus the naked, unfinished base. |
Saturday, March 17, 2012
West Wind Cowboy Test Photos
I've been wanting to set up a small studio in the game room, but all the big box hardware stores don't have the type of light bulb I need for my lamps. As a result, I'll have to go to the Light Bulbs Unlimited store downtown. I've been wanting to go there for weeks now, but we know how those things go, especially with me!
Anyway, the weather has been nice, so I took the camera outside. I set up a make-shift "studio" on a card table in the driveway, using God's own light bulb. At least this time no neighbors stopped by to see what I was doing. (That happens a lot in our neighborhood, which I like, but this time I just wanted to snap photos as quickly as possible without getting into the entire history of our hobby!)
The Soviets Are Coming!
I shot photos of all 25 finished Soviets, along with this test photo of some of my Western figures. Over the next several days, I'll be posting the photos of the Soviets in chunks along with my paint lists. Plus a little tutorial about how I painted their gun barrels, which look much better in person than my little Lumix snappy does them justice. Lots to come. (Note: I'll be doing the bases as soon as my hands can handle it.)
West Wind Cowboys
The three figures in the photo are from West Wind's Cowboy Wars line, which is made by Old Glory. I make it no secret that I love this line of figures, though there are a few clinkers here and there. I grabbed three figures out of the box for a test shot.
The figure on the far left is from pack ZCW-10 US Marshalls. It comes with a very John Wayne-looking figure. I painted this fellow's face a long time ago when learning how to paint flesh, but only recently finished his outfit. His trousers are Americana Burnt Umber, and the coat is Americana Russet. Can't recall the hat's color.
The middle figure, which I just realized has been seen on the blog long ago, is from ZCW-29 The Long Riders. I finished him a couple years ago. You can see how my shading and highlighting are different now than back then. I have no clue about the paints I used!
The far right figure is from West Wind's Gothic Horror - Realms of Terror - Jekyell & Hyde series of figures. This is one of four figures from pack GHJ-5 London Gentlemen. I painted his face a long time ago, but painted eyes on him when I did my Soviets last year. Other than his skin, I totally painted him last Sunday afternoon. I'm quite excited because I painted stripes on his pants. I have a very difficult time painting straight stripes. I think I'm getting better at it. His trousers are Americana Graphite, and the stripes are Folk Art Neutral Grey. His overcoat is Americana Black Plumb. (That was an oops! I wanted to paint it dark maroon, but grabbed the wrong bottle. Didn't realize it until I started painting! Sometimes mistakes work out for the best.) For a shadow color, I used Ceramcoat Dark Burnt Umber with a touch of Black Plumb. For highlights, I used Black Plumb mixed with Polyscale French Light Blue because it was easy to reach, though any very light grey will do. For the top highlight, I added a dab of white to this mix. The hat is also Americana Graphite, highlighted with Folk Art Neutral Grey, and then Folk Art Steel Grey for top-highlight.
That's all for today.
Watch for the photos of the Soviets. And then next weekend is the AWI-ACW-WWII-Modern military reenactment. Plus, I'll be returning to some old projects, like my ACW fellows, who have been feeling might lonely far too long!
Thursday, March 15, 2012
Force on Force: Too Much To Handle
Last week, I sold my like-new copies of Force on Force and its first scenario book, Road to Baghdad. For many months, I had tried to pick up the rulebook and wrap my head around it to no avail. Within minutes of reading, my eyes would begin glassing over while my brain would begin looking for ways to escape the page.
I know many people enjoy playing the game, and I do believe there is a game in there just wanting to get out and play. I just could not find it. It's one of only a few rulebooks that I have never been able figure out or remain focused on while reading it. (For me, the original Gulf Strike from Victory Games remains on the top of that list and will never be dethroned!)
I think some of my problem with Force on Force comes from it's dense text and occasionally confusing writing style. It's organization also can be confusing at times. The main problem, however, is that the game is just too much for me to handle. For example, when the rules explain ranged combat, I kept getting lost in modifiers before I could even get to what they were supposed to be modifying. Firepower has eight modifiers alone. Cover also has around eight modifiers. Then there are armor modifiers and troop quality modifiers and support weapon modifiers and diminishing fire and splitting fire and.... Well, you get the point. There is just too much there for me to keep track of without someone teaching me the rules.
On The Road to Baghdad
While I had many problems reading the core rulebook and keeping all the rules in my head, I didn't have that many problems reading the scenario book, Road to Baghdad. Granted, the writing style isn't that different from the core rulebook, but like most scenario books the organization of Road to Baghdad is much simpler than a rulebook.
I like Road to Baghdad's overview of the days leading up to the war and its discussion about the early war's operations in general. That was the best summary of the war I had read--neither too complicated nor too simplistic. It helps frame the scenarios.
I also like how the scenarios are presented. Giving the actual events surrounding the engagement and then how those events and OOB's had to be changed to make the scenario playable, so the Americans don't win all the time, is very nice. I also found the sections explaining how each engagement historically unfolded to be of great insight and interesting. Overall, I found that gamers really can use the book for any set of rules, not just Force on Force.
I parted with Road to Baghdad only because I doubted I would be doing any modern skirmish gaming because it's just too complicated as subject for me to learn on my own. I don't understand the weapons, the tactics, nor all the jargon. I guess I've come to a point in my life where I don't have the time to learn them on my own. On the other hand, Force on Force has made me appreciate our brave men from WWII, who fought with much simpler weapons and very little training compared to today. It's amazing what those ordinary guys accomplished, as well as sacrificed in large numbers.
So until someone at a convention teaches me how to play Force on Force, I felt that I had to part with the game, using that money to fund other projects. But that is another post for another day.
I know many people enjoy playing the game, and I do believe there is a game in there just wanting to get out and play. I just could not find it. It's one of only a few rulebooks that I have never been able figure out or remain focused on while reading it. (For me, the original Gulf Strike from Victory Games remains on the top of that list and will never be dethroned!)
I think some of my problem with Force on Force comes from it's dense text and occasionally confusing writing style. It's organization also can be confusing at times. The main problem, however, is that the game is just too much for me to handle. For example, when the rules explain ranged combat, I kept getting lost in modifiers before I could even get to what they were supposed to be modifying. Firepower has eight modifiers alone. Cover also has around eight modifiers. Then there are armor modifiers and troop quality modifiers and support weapon modifiers and diminishing fire and splitting fire and.... Well, you get the point. There is just too much there for me to keep track of without someone teaching me the rules.
On The Road to Baghdad
While I had many problems reading the core rulebook and keeping all the rules in my head, I didn't have that many problems reading the scenario book, Road to Baghdad. Granted, the writing style isn't that different from the core rulebook, but like most scenario books the organization of Road to Baghdad is much simpler than a rulebook.
I like Road to Baghdad's overview of the days leading up to the war and its discussion about the early war's operations in general. That was the best summary of the war I had read--neither too complicated nor too simplistic. It helps frame the scenarios.
I also like how the scenarios are presented. Giving the actual events surrounding the engagement and then how those events and OOB's had to be changed to make the scenario playable, so the Americans don't win all the time, is very nice. I also found the sections explaining how each engagement historically unfolded to be of great insight and interesting. Overall, I found that gamers really can use the book for any set of rules, not just Force on Force.
I parted with Road to Baghdad only because I doubted I would be doing any modern skirmish gaming because it's just too complicated as subject for me to learn on my own. I don't understand the weapons, the tactics, nor all the jargon. I guess I've come to a point in my life where I don't have the time to learn them on my own. On the other hand, Force on Force has made me appreciate our brave men from WWII, who fought with much simpler weapons and very little training compared to today. It's amazing what those ordinary guys accomplished, as well as sacrificed in large numbers.
So until someone at a convention teaches me how to play Force on Force, I felt that I had to part with the game, using that money to fund other projects. But that is another post for another day.


